What Is a VLAN?
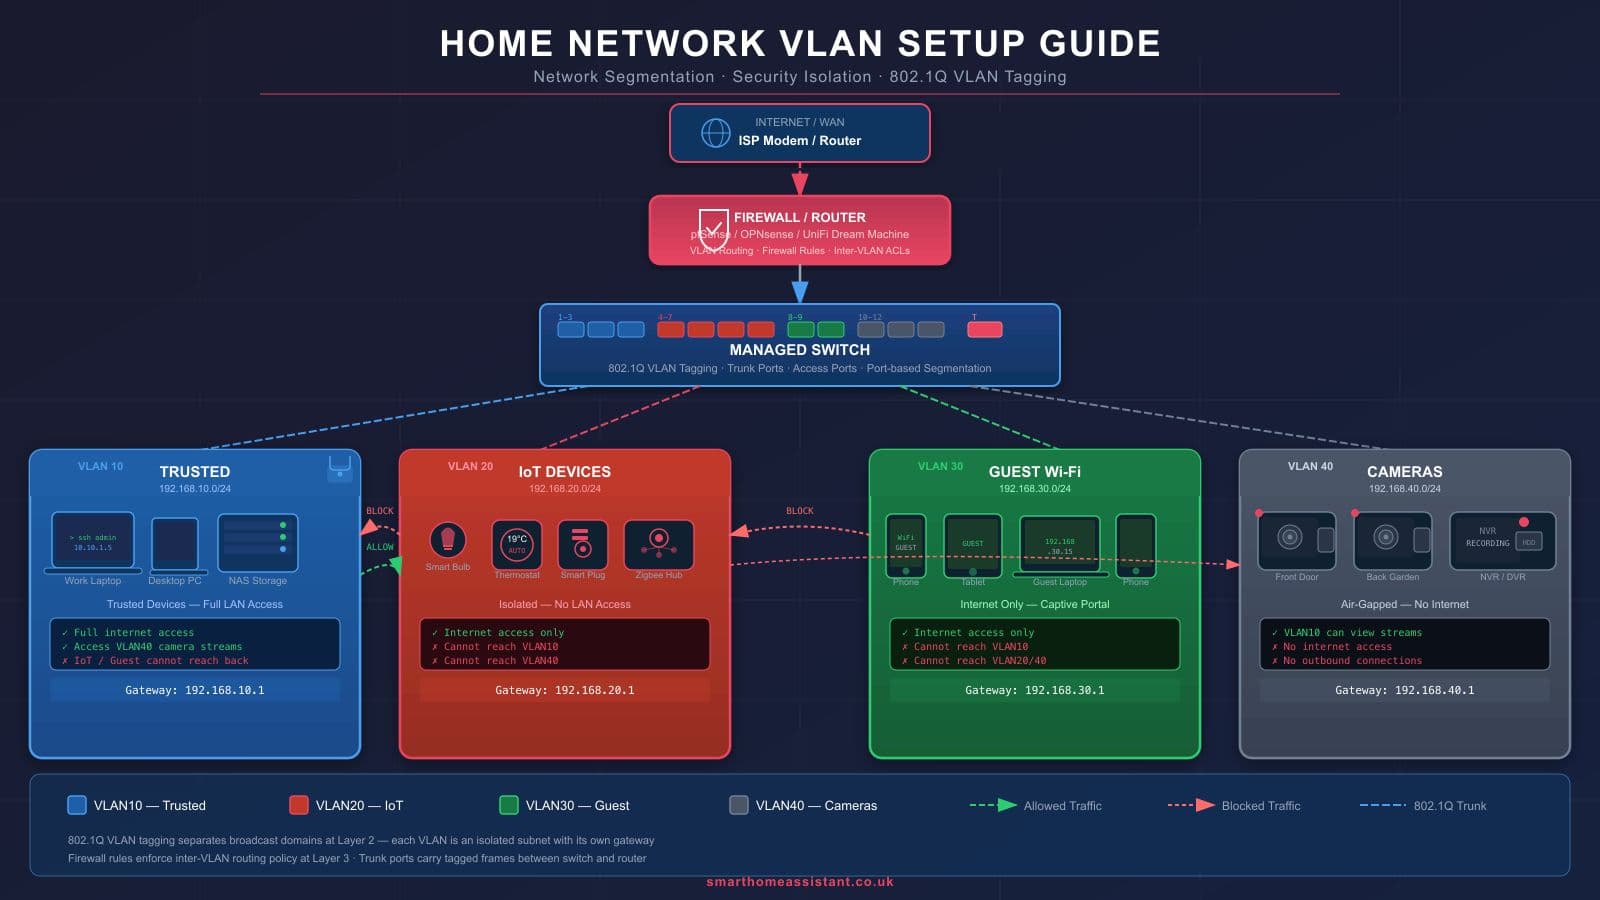
A Virtual LAN (VLAN) is a way of logically dividing your home network into separate, isolated segments — without needing separate physical hardware for each one. Think of it like putting different groups of devices into their own walled gardens. Devices on VLAN 10 (your trusted PCs and phones) cannot talk directly to devices on VLAN 20 (your IoT gadgets) unless you explicitly open a gateway between them.
VLANs work at Layer 2 of the network stack using a standard called 802.1Q tagging. Each network packet gets a small tag attached to it, identifying which VLAN it belongs to. Your managed switch and router read these tags and route traffic accordingly.
For home users, VLANs solve a real security problem: modern smart home devices — thermostats, cameras, bulbs, robot hoovers — often run outdated firmware with known vulnerabilities. If a rogue device on your network gets compromised, you do not want it to have free access to your laptop or NAS drive.
Why Segment Your Home Network?
There are three compelling reasons to set up VLANs at home in the UK in 2026:
- IoT security isolation: Smart home devices are a common attack vector. Putting them on their own VLAN means a compromised bulb cannot reach your banking laptop. The UK's Product Security and Telecommunications Infrastructure (PSTI) Act 2022 requires manufacturers to disclose support periods, but older devices remain a risk.
- Guest Wi-Fi: A guest VLAN gives visitors internet access without exposing your shared drives, printers, or Home Assistant instance. Routers like the TP-Link Omada ER605 let you create a dedicated guest network tied to a separate VLAN ID.
- Performance: Broadcast traffic from dozens of IoT devices can clog your network. Separating them into a VLAN reduces unnecessary chatter on your primary LAN.
Required Hardware
To implement VLANs at home you need two things: a managed switch and a VLAN-capable router or access point. Standard consumer routers from your ISP do not support VLANs — you will need to upgrade at least part of your setup.
Managed Switch
The TP-Link TL-SG108E is the go-to entry-level managed switch for UK home users. At around £25–£30 from Amazon UK, it gives you 8 Gigabit ports with 802.1Q VLAN support, QoS, and IGMP snooping — all managed through a simple web interface. It is not rack-mountable but sits neatly on a desk or shelf. Check the current UK price on Amazon.
VLAN-Capable Router / Access Point
You have two main options for the UK home market:
- TP-Link Omada ecosystem: The ER605 router (around £55) paired with an EAP670 or EAP245 access point gives you a unified SDN (Software Defined Networking) controller. You manage everything — VLANs, SSIDs, firewall rules — from the Omada Controller software or cloud portal. Ideal for most UK home users who want a straightforward setup.
- Ubiquiti UniFi: The gold standard for prosumer home networking. A UniFi Dream Machine or Dream Router plus a UniFi Switch handles everything in one app. It is more expensive (entry at around £150+) but the VLAN configuration is particularly slick. See our UniFi home setup guide for UK users for a full walkthrough.
If you already have an Omada or UniFi access point, the TL-SG108E plugs in as a downstream managed switch and the two ecosystems do not need to be the same brand — the 802.1Q standard is universal.
Step-by-Step VLAN Setup with TP-Link TL-SG108E and Omada
This guide assumes you have an Omada ER605 router, an EAP access point, and the TL-SG108E switch. We will create two VLANs:
- VLAN 10 — Trusted LAN (your PCs, phones, NAS, Home Assistant)
- VLAN 20 — IoT LAN (smart plugs, bulbs, cameras, sensors)
Step 1: Plan your VLAN IDs and subnets
Before touching any hardware, write down your plan:
- VLAN 10:
192.168.10.0/24, gateway192.168.10.1 - VLAN 20:
192.168.20.0/24, gateway192.168.20.1
Step 2: Create VLANs in the Omada Controller
- Open the Omada Controller (local IP or via omada.tplinkcloud.com).
- Go to Settings > Wired Networks > LAN and click Create New LAN.
- For your IoT network, set Name: IoT, VLAN ID: 20, Subnet: 192.168.20.0/24, enable DHCP Server.
- Repeat to confirm VLAN 10 for your Trusted network (this is often the default LAN — just assign it VLAN ID 10).
Step 3: Create separate SSIDs for each VLAN
- Go to Settings > Wireless Networks > WLANs and click Create New WLAN.
- Create HomeNet tied to VLAN 10 and HomeNet-IoT tied to VLAN 20. Use a different, strong password for the IoT SSID.
- Apply and push config to your EAP access point.
Step 4: Configure the TL-SG108E managed switch
Open a browser and navigate to the switch's web interface (default IP 192.168.0.1, username/password both admin).
- Go to VLAN > 802.1Q VLAN. Enable 802.1Q VLAN mode.
- Create VLAN 10: add it to the VLANs list. Assign the uplink port (Port 1, connecting to your router) as Tagged for VLAN 10. Assign trusted device ports (e.g. Ports 2–4) as Untagged for VLAN 10.
- Create VLAN 20: Port 1 again as Tagged. Assign IoT device ports (e.g. Ports 5–7) as Untagged for VLAN 20.
- Go to VLAN > 802.1Q PVID Setting. Set the PVID (Port VLAN ID) for each untagged port to match its VLAN: Ports 2–4 get PVID 10, Ports 5–7 get PVID 20.
- Save settings. The switch will now correctly tag traffic from each port before sending it up to the router.
Step 5: Connect your access point to the switch
Your Omada EAP access point should connect to a port configured as Tagged for both VLAN 10 and VLAN 20 (e.g. Port 8). This is a trunk port — it carries traffic from multiple VLANs simultaneously, each labelled with its 802.1Q tag. The EAP will broadcast both SSIDs and tag the traffic appropriately.
IoT VLAN vs Main LAN: What Can Talk to What?
By default, devices on different VLANs cannot communicate with each other. The Omada router sits between the two and makes the routing decision based on your firewall rules. Here is the recommended traffic policy:
- IoT → Internet: Allow. Most smart home devices need cloud access to function.
- IoT → Trusted LAN: Block. IoT devices should never initiate connections to your PCs, NAS, or Home Assistant.
- Trusted LAN → IoT: Allow. You need to reach your devices from your main network to control them.
- IoT → Management/Router UI: Block. Prevent IoT devices from accessing your router's admin interface.
Firewall Rules Basics
In the Omada Controller, firewall rules live under Settings > Transmission > Firewall. Rules are evaluated top-to-bottom — the first match wins.
- Create a rule: Source = IoT network (192.168.20.0/24), Destination = Trusted LAN (192.168.10.0/24), Action = Deny. This blocks IoT devices from reaching your main network.
- Create a rule: Source = IoT network, Destination = Router IP (192.168.10.1), Action = Deny. This blocks access to the admin console.
- Ensure the default outbound rule allows IoT devices to reach the internet.
For Ubiquiti UniFi users, the same logic applies in the UniFi Network > Firewall & Security section. See our IoT VLAN setup guide for Home Assistant for a deeper dive into UniFi firewall policies.
Home Assistant on an IoT VLAN
Where does Home Assistant live? This is a common source of confusion. The answer is: Home Assistant belongs on your trusted VLAN (VLAN 10), not the IoT VLAN.
Here is why: Home Assistant needs to initiate connections to IoT devices — querying sensors, sending commands to bulbs, polling local APIs. If HA were on the IoT VLAN, it would also be blocked from your main PC, dashboards, and any integrations running on your LAN. Placing it on VLAN 10, with a firewall rule allowing VLAN 10 to reach VLAN 20, gives HA full control of IoT devices while keeping your main network secure.
mDNS and Discovery
Many IoT devices use mDNS (multicast DNS) for local discovery — the same protocol that makes Apple devices appear in Finder or allows you to access devices by hostname. mDNS traffic does not cross VLAN boundaries by default. To fix this, enable an mDNS repeater on your router:
- In Omada: go to Settings > Services > mDNS and enable it across your VLAN interfaces.
- In UniFi: enable mDNS under Network > Settings > Services.
Once enabled, Home Assistant will be able to discover Chromecast devices, HomeKit accessories, and other mDNS-advertised gadgets sitting on your IoT VLAN.
MQTT Broker Access
If you run an MQTT broker (Mosquitto) on your Home Assistant server (VLAN 10), your Zigbee/Z-Wave sensors on VLAN 20 need to reach it on port 1883. Create a specific firewall rule to allow: Source = IoT VLAN, Destination = Home Assistant IP on VLAN 10, Port = 1883, Action = Allow. Place this rule above the broader IoT-to-Trusted-LAN deny rule so it takes priority.
Troubleshooting Common Issues
- Device not getting an IP address: Double-check the PVID setting on the TL-SG108E port. An incorrect PVID means untagged traffic is assigned to the wrong VLAN, leaving the device without a DHCP lease.
- Home Assistant cannot see IoT devices: Enable mDNS reflection on your router. Also confirm your firewall rule allows VLAN 10 → VLAN 20 traffic.
- IoT devices cannot reach the internet: Check the Omada WAN firewall is not blocking outbound IoT traffic. The IoT subnet should appear in NAT rules.
- Switch web interface inaccessible after config: If you accidentally assigned Port 1 (your PC's port) to the wrong VLAN, factory reset the TL-SG108E by holding the reset button for 5 seconds.