How Device Tracker Entities Work
Every device_tracker entity reports one of a small set of states. Per the Home Assistant documentation, a device tracker reports home if it's inside the home zone, the name of a smaller zone if it's inside one of those instead, not_home if it's outside every zone, and unavailable or unknown if the platform has lost contact with the device.
Device trackers also fall into two categories. Home Assistant's docs describe position trackers — which use GPS or GNSS coordinates and set tracking_type: position — and connection trackers, which simply report whether a device is connected to something (a router, a network scan) and set tracking_type: connection. The Companion app is a position tracker; Nmap Tracker and Ping are connection trackers. This distinction matters because position trackers can tell you which zone you're in, while connection trackers can only tell you home or not.
One important note if you're following an older tutorial: Home Assistant's docs flag that some integrations still expose an older device tracker model that lacks the tracking_type and in_zones attributes, and these legacy trackers are scheduled for removal in the first half of 2027. If a platform you're using still relies on the old known_devices.yaml file, it's worth planning a migration to a config-flow-based platform before then.
What do you need before you start?
- Home Assistant: a running instance with access to Settings → Devices & Services.
- For GPS tracking: the Home Assistant Companion app installed on the phone you want to track, with location permission granted.
- For network-based tracking: your home network's IP range (for Nmap Tracker) or the device's IP address/hostname (for Ping), and a router that allows local devices to scan or ping other clients on the network.
Step 1: Set up a device tracker platform
Method 1: GPS tracking with the Companion app
Best for: away/home detection and named zones (work, school, the gym) without any extra hardware.
The Home Assistant Companion app registers a device_tracker entity automatically once you log in and grant location permission — no YAML required. According to the Companion app documentation, location updates are triggered by zone entry/exit, app launches, background refreshes, significant location changes on iOS, and (optionally) iBeacon detection.
To set it up: install the app, sign in to your Home Assistant instance, and grant location access when prompted. On Android, also enable Zone Based Tracking in the app's companion settings — iOS sets this up automatically at launch. The docs note the app supports up to 100 geofenced zones; anything beyond that won't register. You can also choose how much location detail is shared per server — Exact (full GPS coordinates), Zone Name Only for privacy-conscious setups, or disabled entirely.
Battery impact is generally modest since the app relies on geofencing rather than continuous polling, though the docs note that Android's High Accuracy Mode — constant GPS — will drain the battery noticeably faster and is best restricted to specific zones or Bluetooth triggers rather than left on permanently.
Method 2: Network-based tracking with Nmap Tracker
Best for: households that don't want to install an app on every device, or as a secondary/fallback tracker.
Nmap Tracker scans your network directly for connected devices rather than relying on your router's own client list, which makes it useful when your router doesn't expose a compatible integration. It's set up entirely through the UI — no YAML needed.
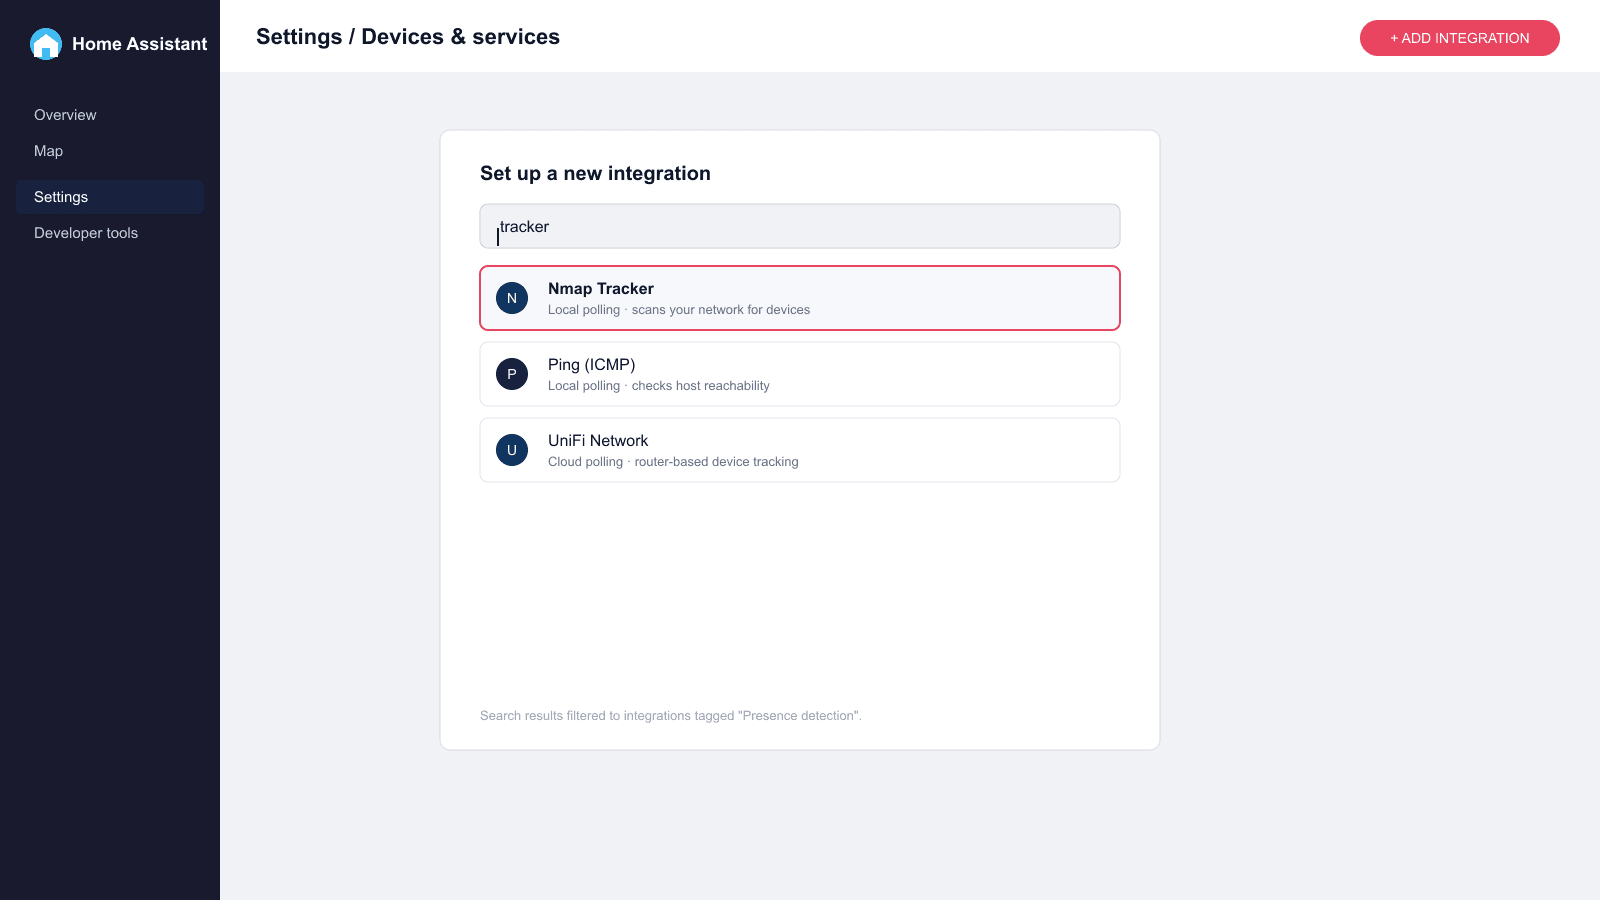
Go to Settings → Devices & Services → Add Integration, and search for "tracker" to see the presence-detection integrations available, including Nmap Tracker, Ping, and any router-specific integrations like UniFi.
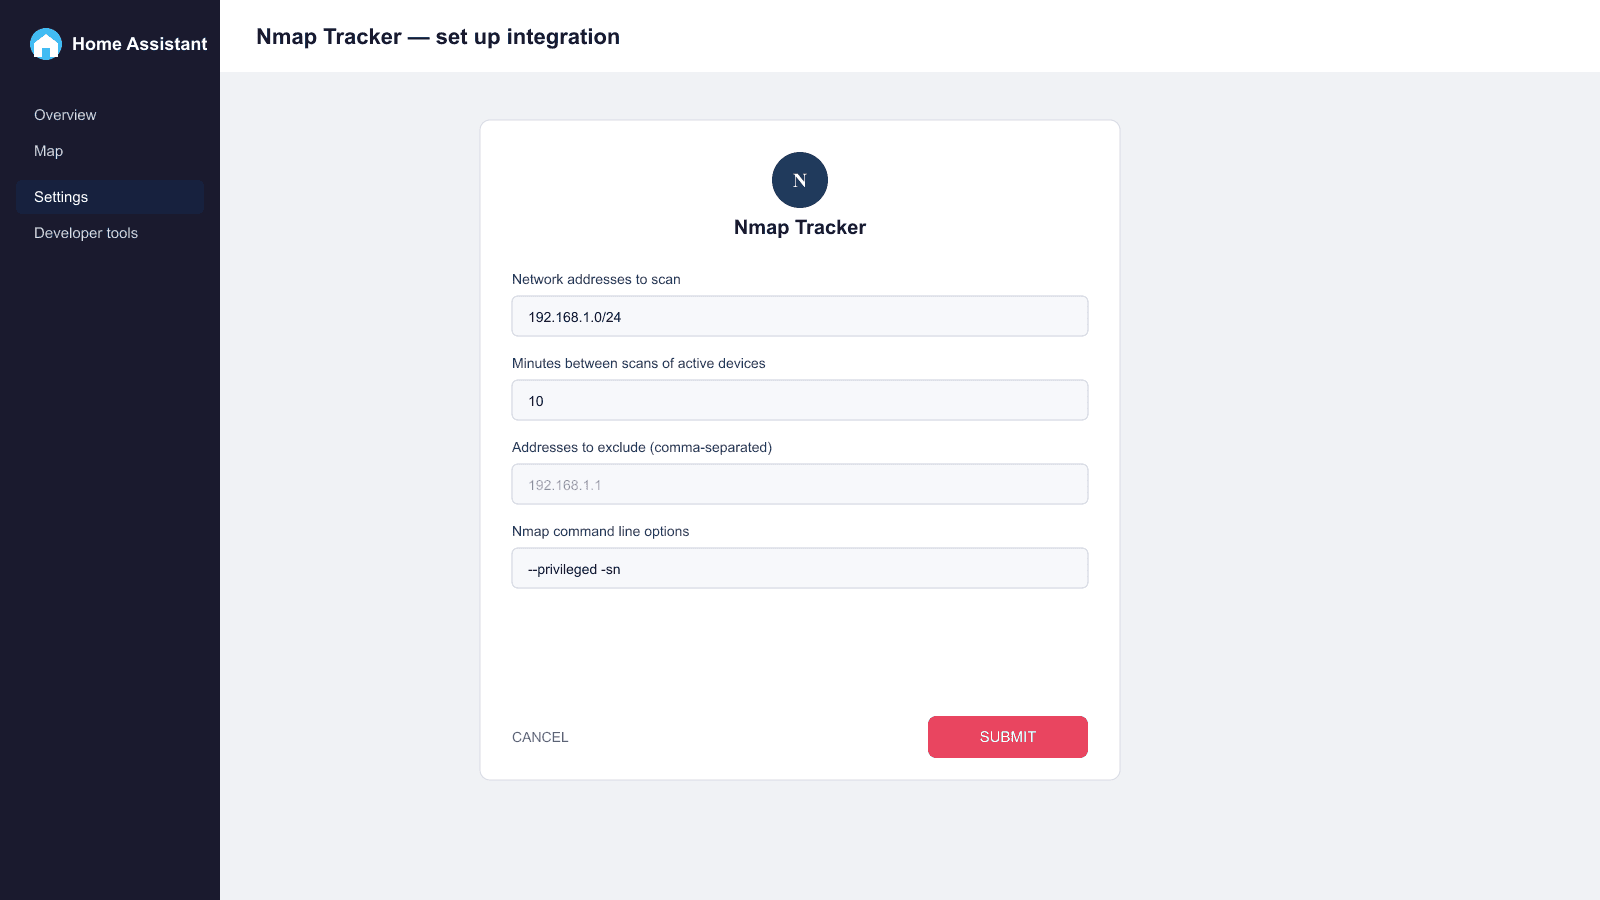
Select Nmap Tracker and fill in the configuration dialog. The key fields, per the Home Assistant docs, are the network addresses to scan (CIDR notation, e.g. 192.168.1.0/24), the minimum number of minutes between scans of already-known active devices, a comma-separated list of addresses to exclude, and optional Nmap command-line parameters for advanced scanning behaviour.
Home Assistant's docs describe Nmap Tracker's IoT class as "Local Polling" — it's an active scan initiated from your Home Assistant instance, not a passive listen. Shorter scan intervals detect arrivals and departures faster but increase network chatter and, for battery-powered devices, drain them slightly faster from having to respond to more probes.
Method 3: Ping (ICMP) tracking
Best for: a lightweight, single-device fallback tracker that doesn't need a full network scan.
The Ping integration sends ICMP echo requests to a specific host and reports whether it responds. It's also set up via Settings → Devices & Services → Add Integration → Ping (ICMP), and it can expose three entity types: a binary sensor (enabled by default, simple online/offline), sensors for round-trip time, jitter, and packet loss (disabled by default), and — for presence use — a device_tracker entity (also disabled by default, so you'll need to enable it manually after adding the integration).
Two settings worth tuning: ping count — how many echo requests are sent per check, default five — and consider home, the delay in seconds before a device is marked not_home after it stops responding, which defaults to 180 seconds (three minutes). The default polling interval is 30 seconds.
Both Nmap Tracker and Ping share the same real-world caveat: modern phones frequently switch off Wi-Fi to save battery when idle, which can cause spurious not_home readings even while the phone is sitting on a table at home. A longer consider_home window reduces false departures at the cost of slightly slower detection of a genuine departure.
Legacy YAML Trackers: Bluetooth LE Tracker
Before the modern Bluetooth integration existed, Home Assistant offered Bluetooth LE Tracker as a YAML-configured platform under the device_tracker: key:
device_tracker:
  - platform: bluetooth_le_tracker
Discovered BLE devices were stored in known_devices.yaml with a BLE_ prefix. Key options included interval_seconds (default 12), track_new_devices, and battery-tracking toggles. Home Assistant's docs now list it as a legacy integration that depends on the newer Bluetooth integration being enabled, and while it still functions, new setups are steered toward configuring Bluetooth-based presence through the main Bluetooth integration rather than this older platform — particularly given the 2027 removal timeline for trackers using the old attribute model.
Step 2: Check entity state in Developer Tools
Once any platform is configured, you can inspect the resulting entity directly. Go to Developer tools → States and search for your device_tracker entity. This is the fastest way to confirm a platform is actually working before wiring it into an automation — check that state updates correctly when you leave and return, and review the attributes for context.
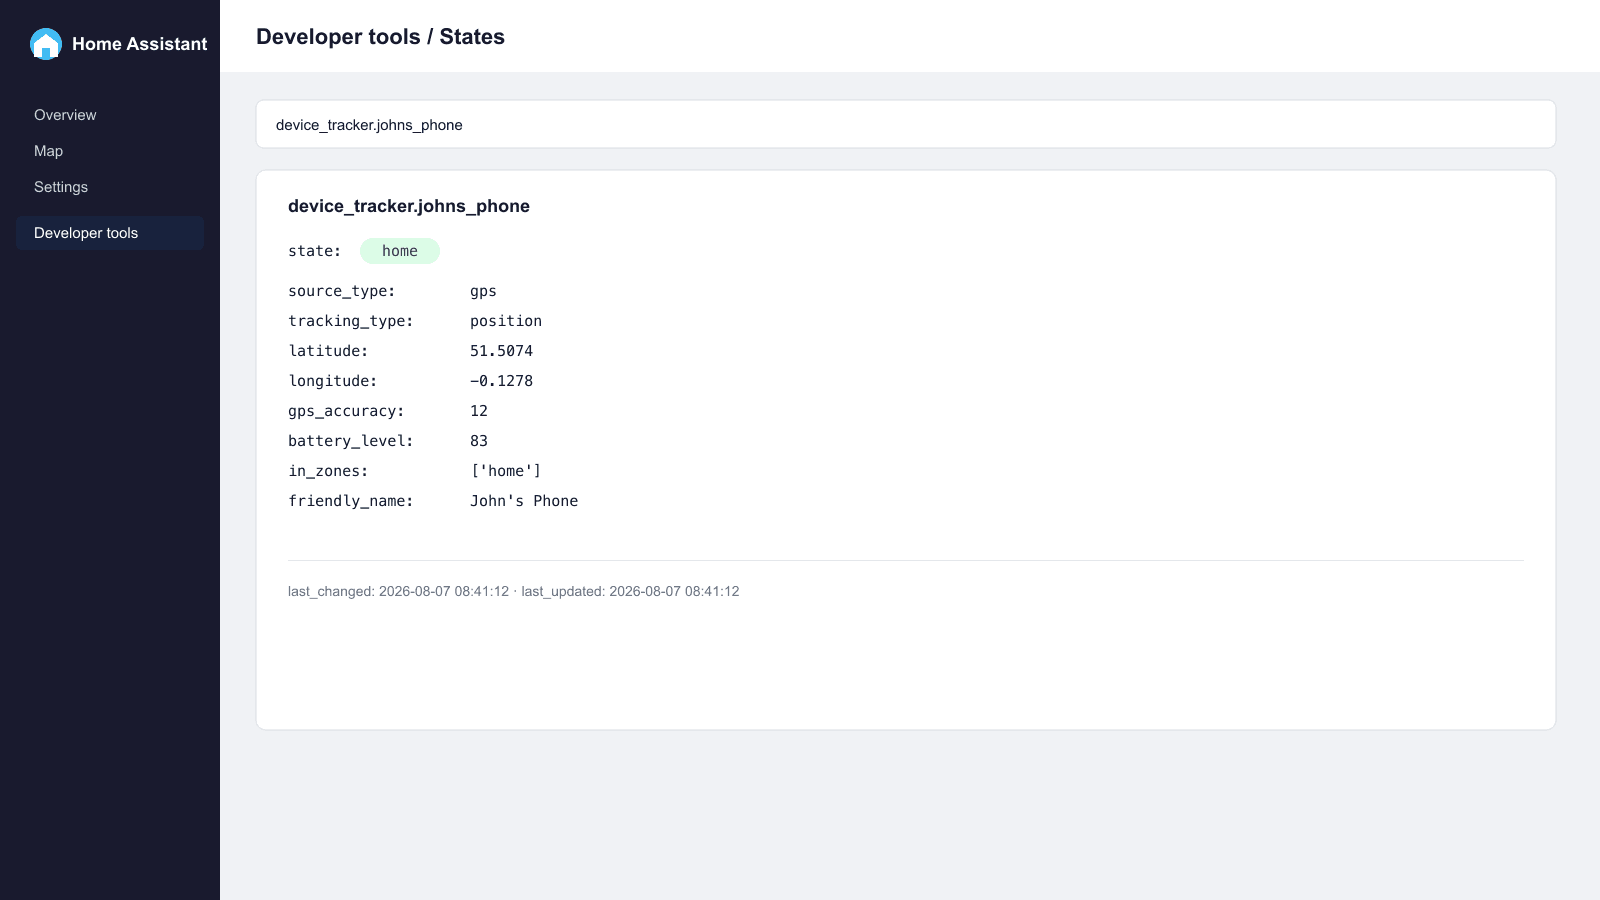
For a GPS-based tracker like the Companion app, you'll see attributes such as source_type: gps, latitude, longitude, gps_accuracy, and battery_level. A connection tracker like Nmap or Ping shows a simpler attribute set, since it has no coordinates to report — just the connection state itself.
Step 3: Automate on device tracker state
Once an entity reports reliably, you can trigger automations directly off its state changes, or — better, once you have more than one tracker — off the combined person entity that Home Assistant builds from multiple device trackers. A basic example:
trigger:
  - trigger: state
    entity_id: device_tracker.johns_phone
    from: "not_home"
    to: "home"
action:
  - action: light.turn_on
    target:
      entity_id: light.hallway
For automations built around more than one tracked person, see the Home Assistant automations guide for trigger and condition syntax.
Choosing a Platform
For most households, the Companion app is the best starting point — it needs no extra hardware, supports multiple named zones, and updates via efficient geofencing rather than constant polling. Add Nmap Tracker or Ping as a secondary, app-free tracker for devices that can't or shouldn't run the Companion app — a guest's phone, a laptop, or anyone unwilling to share GPS location. Link both to the same person entity so Home Assistant can reconcile them automatically, favouring the stationary network tracker while you're home and GPS while you're away.