What are we connecting? The SigenStor EC 10.0 SP at a glance
The EC 10.0 SP is Sigenergy's single-phase hybrid controller: one box that combines the solar inverter, battery inverter and system brain, with separate SigenStor battery modules stacked beneath it. Our installation reports the figures below through Home Assistant, alongside the manufacturer's datasheet values.
| Spec | Value | Source |
|---|---|---|
| Nominal AC output | 10 kW (11 kVA maximum apparent power), single-phase | Sigenergy datasheet |
| Solar inputs | 4 MPPT trackers, one string each (PV1–PV4 in Home Assistant) | Sigenergy datasheet |
| Rated battery capacity | 9.04 kWh | Reported by our plant |
| Rated charge / discharge power | 4.4 kW / 4.8 kW | Reported by our plant |
| Firmware | V100R001C22SPC117 | Reported by our inverter |
| Backup (EPS) operation | Needs the Sigen Energy Gateway and a Sigen battery | Sigenergy datasheet |
| Local interface | Modbus TCP (port 502), enabled by the installer | Integration README |
Two of our four solar inputs are in use. If you are still deciding whether a battery makes sense at all, start with our solar battery storage guide.
Why choose Sigenergy? What it does well
Sigenergy's pitch is one platform for solar, battery, EV charging and, increasingly, heat pump control, and the independent British Solar Blog calls it the newest serious entrant in the UK battery market. These are the strengths that stand up to checking.
- The battery can grow with you. One controller takes between one and six battery modules, and the datasheet lists 5 kWh and 8 kWh modules with 5.2 and 7.8 kWh usable. One installer reports that newer 6 kWh and 10 kWh modules can be added to older stacks without replacing the controller. That comes from a seller, so confirm it for your own system. The British Solar Blog calls the modular design "a genuine long-term advantage".
- Whole-home backup is part of the design. With the Sigen Energy Gateway and a Sigenergy battery, Sigenergy claims zero-millisecond switchover, so the house should ride through a power cut without a visible gap. That is a manufacturer claim we have not tested. Check which gateway you are quoted: one UK retailer lists the HomePro SP-F (100 A, up to 22 kW) as the whole-home model and the standard HomePro SP (54.6 A, 12 kW) as partial loads only.
- It grows into an EV charger and tariffs. Octopus lists Sigenergy as an eligible battery for its Charge Pack, and Sigenergy sells AC and DC EV chargers that are designed to work with the same controller and app.
- You can keep control local. Modbus TCP gives Home Assistant live data and a full set of controls without going through anyone's cloud. In our first days that meant per-string solar readings, charge power that tracked the rated limit, and clean feeds for the Energy dashboard.
- The warranty is long on paper. Sigenergy's European warranty document gives 10 years on the battery and the controller, with a performance guarantee of 70% of usable energy for ten years or a throughput limit of 15.85 MWh (5 kWh module) or 23.77 MWh (8 kWh module), whichever comes first. The copy we read is dated August 2024 and says it may not be the latest version.
What are the downsides of Sigenergy?
- It costs more. The British Solar Blog (updated July 2026) puts Sigenergy at roughly £550 to £750 per usable kWh installed, typically £100 to £150 above GivEnergy or Sunsynk, and says that for solar and battery alone it is "harder to justify over the cheaper alternatives".
- The UK installer base is smaller. The same review says the installer base is expanding but "still smaller than the established players", so get several quotes and ask each installer how many Sigenergy systems they have fitted.
- A government safety report covers an AC plug on this controller. In April 2026 the Office for Product Safety and Standards published report 2604-0013, rating the risk low. The quick-connect AC plug on the single-phase 8, 10 and 12 kW controllers may overheat when installed contrary to the manufacturer's instructions, and Sigenergy has started a modification programme with on-site inspection and repair. Controllers installed and commissioned after February 2026 are not affected, and ours was commissioned well after that. If you are buying, ask your installer to confirm the commissioning date and that the plug was fitted to the manufacturer's instructions. If you own an older unit, the notice gives sigenservice.uk@sigenergy.com as the contact.
- Customer sentiment is mixed. On Trustpilot's UK page Sigenergy scored 2.8 out of 5 from 110 reviews when we checked in October 2026, split almost evenly between five-star and one-star ratings. The recurring complaints are slow support and long waits for replacements, while praise goes to the hardware and the app. Review sites over-represent strong opinions, so treat it as a prompt to ask your installer about aftercare, not a verdict.
- The warranty expects the system to stay online. The document says that if the equipment stays disconnected from the internet for an extended period, Sigenergy may not be able to honour the full ten-year commitment, although it always provides five years from first installation. Local control through Home Assistant does not replace that connection.
- Usable capacity is below the label. The 8 kWh module has 7.8 kWh usable, and the 5 kWh module 5.2 kWh, so compare quotes on usable kWh.
- It is a newer brand. It has a shorter UK track record than the established names, and our own testing covers days, not years.
For context, these are the British Solar Blog's installed-cost estimates per usable kWh. Your quotes will differ, and the figures are one independent site's view, not a price list.
| Battery | Estimated installed cost per usable kWh |
|---|---|
| Sunsynk | £400–£550 |
| GivEnergy | £450–£600 |
| Fox ESS | £450–£600 |
| Sigenergy | £550–£750 |
| Tesla Powerwall 3 | £630–£780 |
Who should buy Sigenergy, and who should look elsewhere?
Sigenergy makes most sense if you expect to add an EV charger or heat pump, want to grow your storage later, value whole-home backup, and like the idea of keeping control local in Home Assistant. Look elsewhere if you want the lowest installed cost for solar plus a battery, the largest pool of installers or the longest UK track record, or if you cannot keep the system connected to the internet.
Our verdict so far: Buy, with conditions. After a few days with an EC 10.0 SP, the hardware and the local data are excellent for a Home Assistant user, and the sensors feed the Energy dashboard cleanly. Get several quotes because it costs more than the alternatives, ask your installer to confirm the commissioning date and how the plug was fitted, and keep the system online to protect the warranty. We cannot yet speak to durability or aftercare, and our battery ran flat under its default settings.
What do you need before you start?
- Hardware: a SigenStor system with the plant reachable on your network. The integration also supports Sigenergy AC and DC charger devices, but we have not tested those.
- Modbus TCP enabled: the setting has to be switched on by your installer, and the integration's own troubleshooting notes remind you to make sure the installer saved it.
- Firmware: the README asks for firmware SPC109 or newer from integration version 1.1.0 onwards.
- Home Assistant: version 2026.1 or newer, plus a recent backup before installing any custom integration.
- HACS: the integration is a custom component installed through the Home Assistant Community Store.
- Optional: the Octopus Energy integration if you want tariff-driven automations, which we use in the examples below.
Step 1: Ask your installer to enable Modbus TCP
This is the step that catches most people out, because it is not a setting you can change yourself in the Sigenergy app. The community setup guide states that the ModBus TCP server must be enabled by your solar installer on each Sigenergy inverter or device, and that it cannot currently be enabled as an end user. The installer can usually do it remotely, so you rarely need a visit.
Ask for two things in the same message: Modbus TCP enabled and saved on the plant and inverter, and the Modbus slave ID of each device. Sigenergy's protocol document reserves address 247 for the plant and 1–246 for inverters and chargers, so a typical single-inverter system reports the plant on 247 and the inverter on 1 (ours does).
Step 2: Give the inverter a fixed IP address
Find the plant's IP address in your router's device list, then reserve it with a DHCP reservation so it never changes. The integration's README recommends a static IP, and says every device in one plant should normally share the same host and port. If the address drifts, every entity goes unavailable at once, which looks like a fault but is only a wrong host.
Step 3: Install the Sigenergy integration through HACS
In HACS, search for Sigenergy ESS Integration (the GitHub project is Sigenergy-Local-Modbus), download it, then restart Home Assistant. The project is community-maintained, not an official Sigenergy product, and we found no official Sigenergy statement about Home Assistant support.
Step 4: Add the plant and inverter
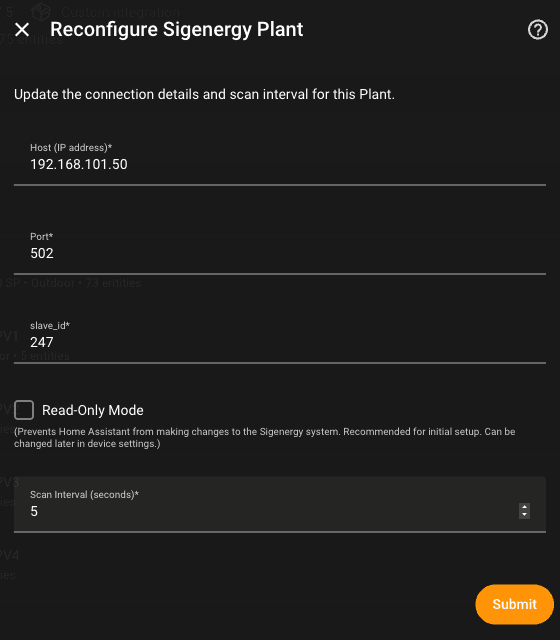
Go to Settings, Devices & services, Add integration and choose Sigenergy. Enter the plant's IP address, port 502 and slave ID 247. Leave Read-Only Mode ticked for now. Our scan interval is set to 5 seconds. Then use Add device on the integration page for each inverter by its slave ID (ours sits on slave ID 1).
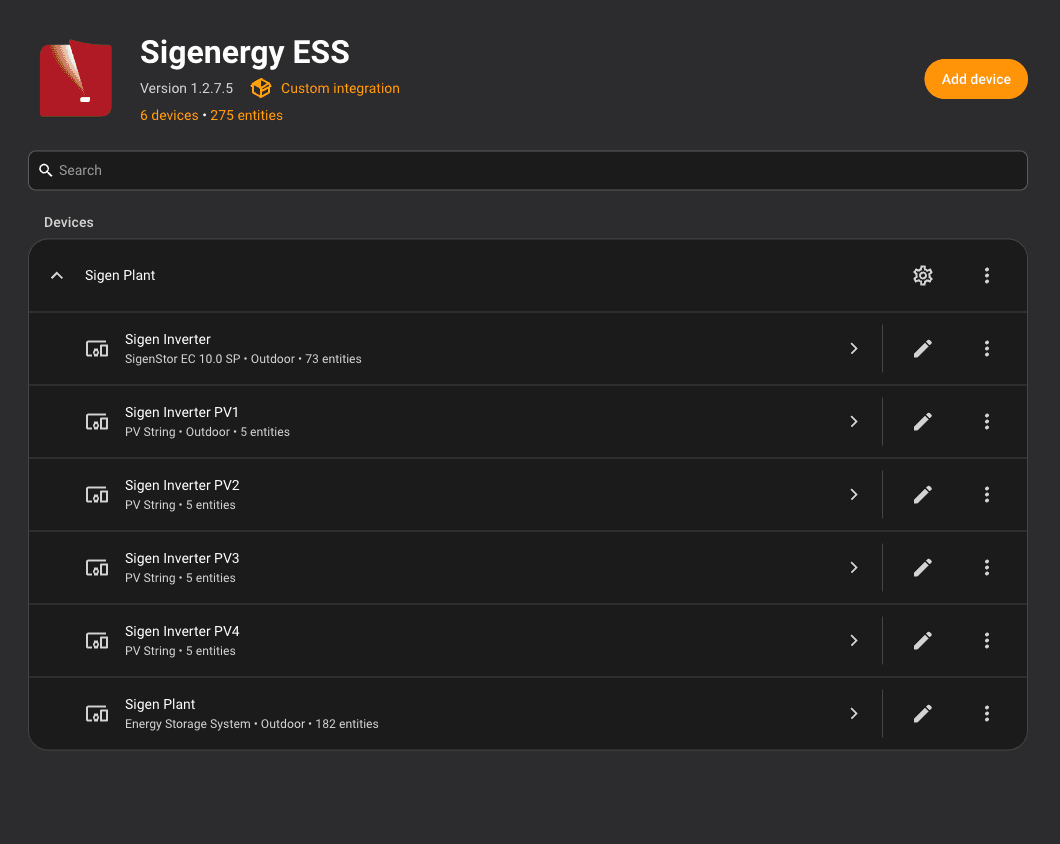
The first scan takes a few seconds, then the devices appear. Each solar string becomes its own device, which keeps per-string voltage, current and daily energy tidy.
Step 5: Add Sigenergy to the Energy dashboard
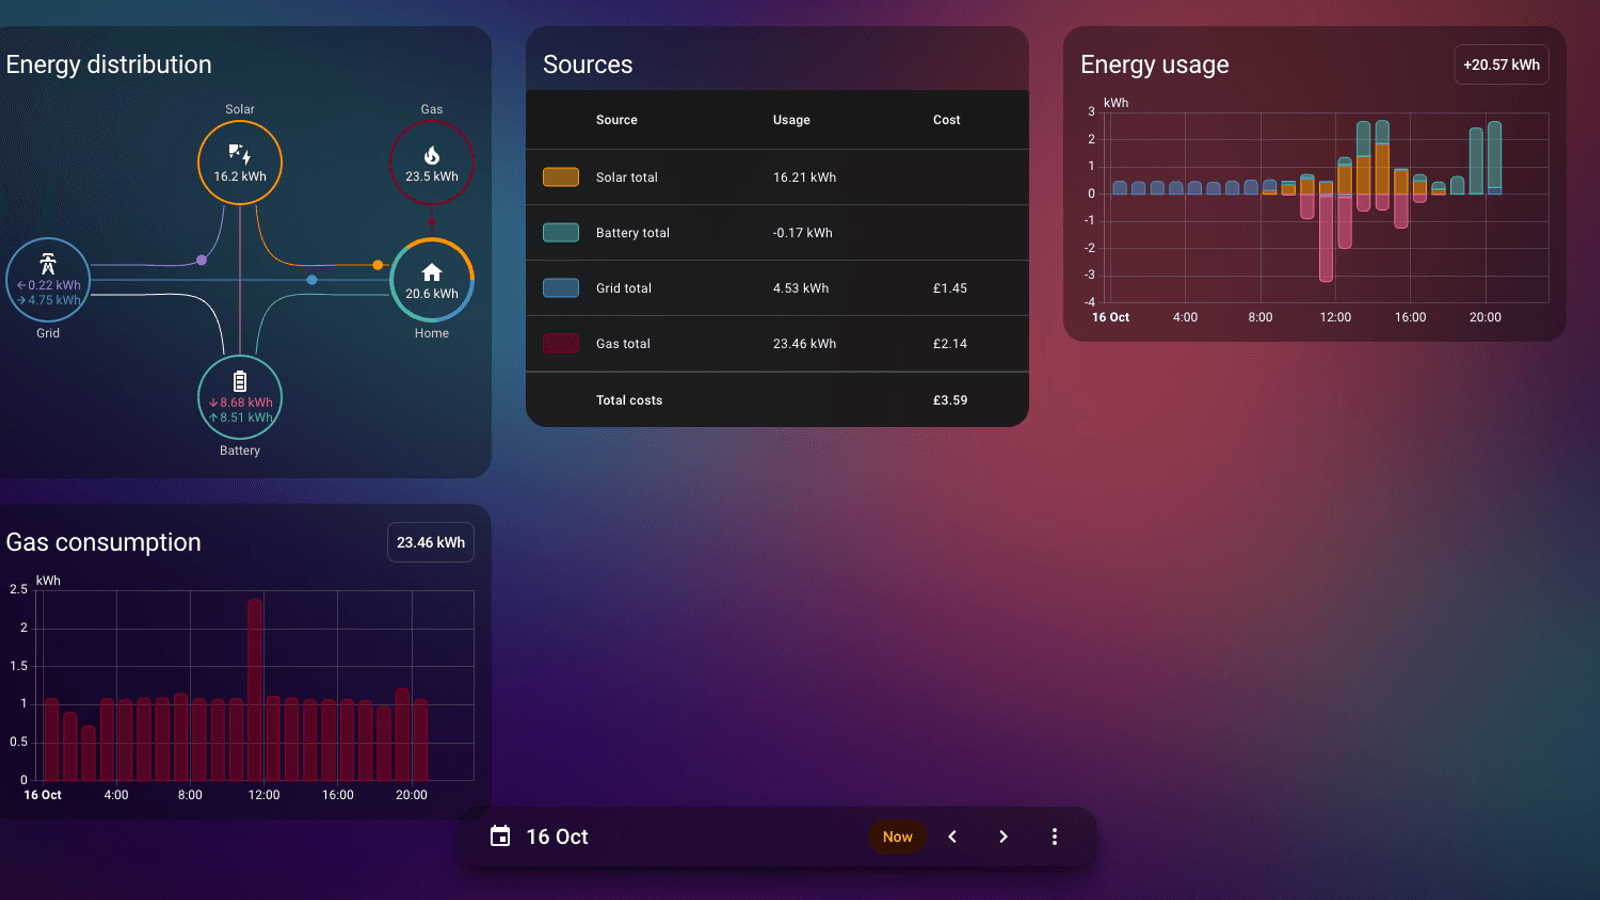
This is the quickest win, and it needs no controls enabled. The integration creates two families of energy sensors, and which you pick matters. The daily sensors report in kWh and reset every day (total_increasing), and the total sensors report lifetime figures in MWh (total). Our Energy dashboard uses the daily ones, which feed the dashboard correctly on our install:
- Solar production:
sensor.sigen_plant_daily_pv_energy - Battery discharged:
sensor.sigen_plant_daily_battery_discharge_energy - Battery charged:
sensor.sigen_plant_daily_battery_charge_energy - Return to grid:
sensor.sigen_plant_daily_grid_export_energy - Grid consumption:
sensor.sigen_plant_daily_grid_import_energy, or your supplier's smart meter sensor if you have one. We use the Octopus meter for import and the Sigenergy sensor for export.
Using the supplier's meter for import keeps your cost figures aligned with your bill, and the inverter's own sensors cover what the meter cannot see. For the wider setup, see our Home Assistant energy monitoring guide and solar monitoring guide.
Step 6: Turn on the controls
Control is off twice over. The README says controls are read-only by default and must be enabled in the integration options, and the entities themselves are disabled in Home Assistant until you switch them on. To enable them, open the plant's Configure dialog, untick Read-Only Mode and submit, then enable the entities you want under Settings, Devices & services, Entities.
Out of the box the useful controls are all off: the Remote EMS and power switches, the control-mode select and every limit number, along with a lot of detail sensors. We enabled the ones this guide uses (the control switches and select, the charge, discharge, export, import and backup limits, and a few extra sensors) and wrote no values. Enabling an entity only makes Home Assistant read it. Nothing on the inverter changes until you write to it.
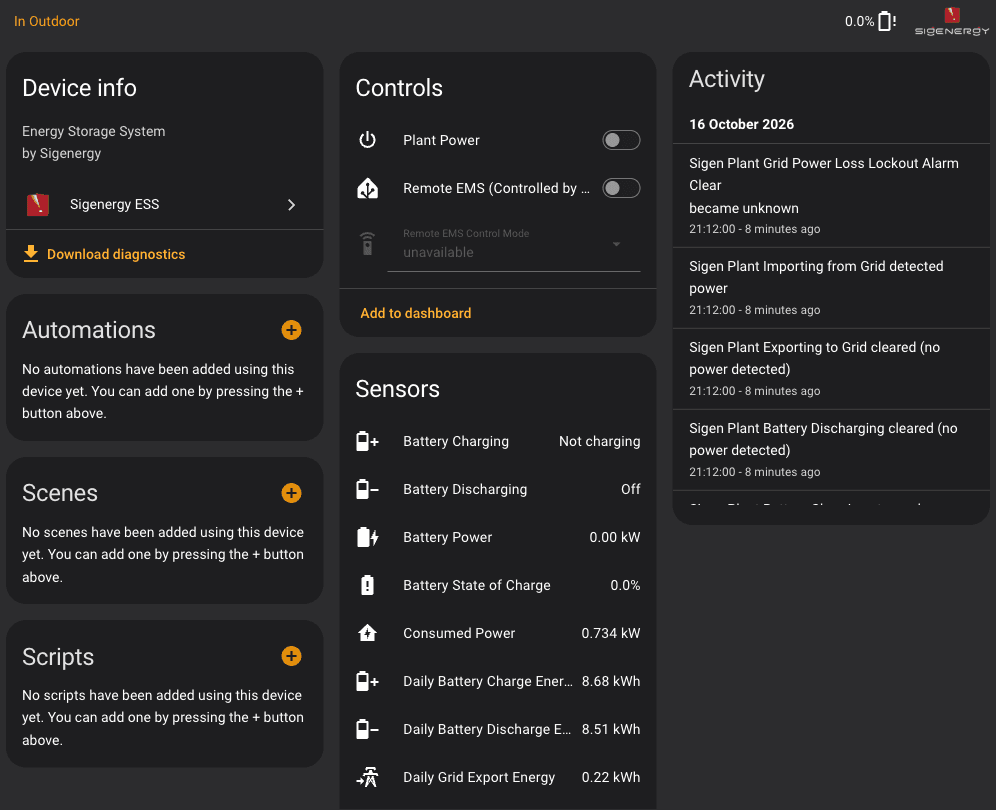
Three behaviours on our system are worth knowing before you touch anything:
- Power switches read off while the plant is running. Plant Power and Inverter Power both showed off while the plant was operating normally. We do not know what writing to them does, so we left them alone and suggest you keep them off dashboards.
- Limit numbers show 4294967.295 kW. The charge, discharge, PV, import and export limits all read this value, which is the 32-bit maximum divided by 1,000. Sigenergy's protocol document describes 0xFFFFFFFF as "not valid" for the PCS import and export limit registers, so it looks like an unset marker, though we could not confirm that for every limit. Treat it as "not set", not a real limit.
- Remote EMS Control Mode is unavailable until Remote EMS is on. That is expected. Turning Remote EMS on hands charging and discharging decisions to Home Assistant, which is a bigger step than enabling an entity. Step 8 explains the trade-off.
Step 7: Build read-only automations first
Everything here only reads from the plant, so it is safe to try straight away. If you are new to automations, start with our Home Assistant automations guide. We checked each entity ID against our live install and validated the automation structure with Home Assistant's own configuration validator. We did not run the automations that write to the plant, and we say so where it matters.
Tell me when the battery is nearly empty
On the day we tested, the battery ran flat at about 20:50 under the Sigenergy app's AI mode, with no reserve left for the evening. This alert fires if the state of charge stays under 10% for two minutes between 16:00 and midnight. Replace the notify service with your own phone.
automation:
  - alias: "Sigenergy: battery nearly empty"
    triggers:
      - trigger: numeric_state
        entity_id: sensor.sigen_plant_battery_state_of_charge
        below: 10
        for: "00:02:00"
    conditions:
      - condition: time
        after: "16:00:00"
        before: "23:59:00"
    actions:
      - action: notify.mobile_app_your_phone
        data:
          title: "Battery almost empty"
          message: >-
            Sigenergy is at {{ states('sensor.sigen_plant_battery_state_of_charge') }}%.
            Grid import is {{ states('sensor.sigen_plant_grid_import_power') }} kW.
Run something on genuine solar surplus
This waits until the house is exporting more than 1.5 kW for five minutes with the battery above 90%, then switches on a load, and stops it when the house starts importing. Use it for something you can interrupt, such as a heater or a dehumidifier, not a dishwasher mid-cycle.
automation:
  - alias: "Sigenergy: start surplus load"
    triggers:
      - trigger: numeric_state
        entity_id: sensor.sigen_plant_grid_export_power
        above: 1.5
        for: "00:05:00"
    conditions:
      - condition: numeric_state
        entity_id: sensor.sigen_plant_battery_state_of_charge
        above: 90
    actions:
      - action: switch.turn_on
        target:
          entity_id: switch.your_heater_plug

  - alias: "Sigenergy: stop surplus load"
    triggers:
      - trigger: numeric_state
        entity_id: sensor.sigen_plant_grid_import_power
        above: 0.5
        for: "00:03:00"
    actions:
      - action: switch.turn_off
        target:
          entity_id: switch.your_heater_plug
Add two helpful template sensors
These go in configuration.yaml (or your template include). Self-sufficiency is the share of today's consumption not drawn from the grid. We computed it from our live sensors: with 20.6 kWh of consumption and about 4.8 kWh imported it came to roughly 77%. The hours-remaining sensor divides the battery's available discharge energy by current load, and reads zero when the battery is empty.
template:
  - sensor:
      - name: "Sigenergy self-sufficiency today"
        unique_id: sigenergy_self_sufficiency_today
        unit_of_measurement: "%"
        state_class: measurement
        state: >-
          {% set load = states('sensor.sigen_plant_daily_load_consumption') | float(0) %}
          {% set grid = states('sensor.sigen_plant_daily_grid_import_energy') | float(0) %}
          {{ ((1 - grid / load) * 100) | round(1) if load > 0 else 0 }}

      - name: "Sigenergy battery hours remaining"
        unique_id: sigenergy_battery_hours_remaining
        unit_of_measurement: "h"
        state_class: measurement
        state: >-
          {% set kwh = states('sensor.sigen_inverter_available_battery_discharge_energy') | float(0) %}
          {% set kw = states('sensor.sigen_plant_total_load_power') | float(0) %}
          {{ (kwh / kw) | round(1) if kw > 0.05 else 0 }}
The hours-remaining sensor uses sensor.sigen_inverter_available_battery_discharge_energy, which is disabled by default, so enable it first.
Step 8: Add Remote EMS automations if you want Home Assistant in charge
Remote EMS is the switch that lets Home Assistant set the battery's behaviour. The automations below follow the pattern in the community EMHASS guide, which switches Remote EMS on and then sets a control mode plus charge and discharge limits. We have not run these on our system. The structure validates, and every entity ID exists on our install, but nobody should treat them as field-tested.
Two cautions apply. First, Sigenergy's documentation we could find does not say what the plant does if Home Assistant stops sending commands. Its protocol document lists no heartbeat or watchdog, only a minimum request period of one second. Second, one forum user reports the system falling back to Maximum Self Consumption after Remote EMS was switched off, not to its earlier mode, which would mean losing AI mode until you set it again in the app. That is anecdotal, so check your own system before relying on automations that you cannot supervise.
Charge from the grid in a cheap window
Replace SERIAL_MPAN with the numbers in your own Octopus entity ID. The automation turns Remote EMS on, waits for the control-mode select to become available, selects grid-first charging and caps the rate at the plant's rated charge power. The second automation hands back to Maximum Self Consumption when the window closes. Our Octopus smart tariff guide explains which tariffs create a window worth charging into.
automation:
  - alias: "Sigenergy: charge from the grid in the cheap window"
    triggers:
      - trigger: state
        entity_id: binary_sensor.octopus_energy_electricity_SERIAL_MPAN_off_peak
        to: "on"
    conditions:
      - condition: numeric_state
        entity_id: sensor.sigen_plant_battery_state_of_charge
        below: 80
    actions:
      - action: switch.turn_on
        target:
          entity_id: switch.sigen_plant_remote_ems_controlled_by_home_assistant
      - wait_template: "{{ not is_state('select.sigen_plant_remote_ems_control_mode', 'unavailable') }}"
        timeout: "00:00:30"
      - action: select.select_option
        target:
          entity_id: select.sigen_plant_remote_ems_control_mode
        data:
          option: "Command Charging (Grid First)"
      - action: number.set_value
        target:
          entity_id: number.sigen_plant_ess_max_charging_limit
        data:
          value: "{{ states('sensor.sigen_plant_ess_rated_charging_power') | float(4.4) }}"

  - alias: "Sigenergy: hand control back when the window ends"
    triggers:
      - trigger: state
        entity_id: binary_sensor.octopus_energy_electricity_SERIAL_MPAN_off_peak
        to: "off"
    actions:
      - action: select.select_option
        target:
          entity_id: select.sigen_plant_remote_ems_control_mode
        data:
          option: "Maximum Self Consumption"
      - action: switch.turn_off
        target:
          entity_id: switch.sigen_plant_remote_ems_controlled_by_home_assistant
Raise the backup reserve before bad weather
Our backup state of charge reads 0%, so the battery has no reserve for a power cut. This pair raises it to 40% when a helper called storm_mode turns on, and restores it afterwards. Set the restore value to whatever yours was before. Whether writing the backup limit needs Remote EMS enabled is something we have not verified.
automation:
  - alias: "Sigenergy: raise the backup reserve for bad weather"
    triggers:
      - trigger: state
        entity_id: input_boolean.storm_mode
        to: "on"
    actions:
      - action: number.set_value
        target:
          entity_id: number.sigen_plant_ess_backup_state_of_charge
        data:
          value: 40

  - alias: "Sigenergy: put the backup reserve back"
    triggers:
      - trigger: state
        entity_id: input_boolean.storm_mode
        to: "off"
    actions:
      - action: number.set_value
        target:
          entity_id: number.sigen_plant_ess_backup_state_of_charge
        data:
          value: 0
What does the Sigenergy integration expose in Home Assistant?
It creates six devices (plant, inverter and four PV strings), and most of the interesting data sits on the plant and inverter:
| Group | Examples | Default |
|---|---|---|
| Power flows | PV power, battery power, grid import and export power, consumed power, plant active power | On |
| Energy counters | Daily and lifetime PV, battery charge and discharge, grid import and export, load consumption | On |
| Battery health | State of charge, state of health, rated capacity, average cell temperature | On |
| State and alarms | EMS work mode, plant running state, grid connection status, six plant and five inverter alarm sensors | On |
| Binary sensors | PV generating, battery charging, battery discharging, importing from grid, exporting to grid | On |
| Per-string data | Voltage, current, power and energy for each of PV1–PV4 | On |
| Diagnostics | Inverter model, firmware, PCS internal temperature, Modbus fetch times, update entity | Mixed |
| Detail sensors | Per-phase voltage, current and power, grid frequency, cell voltage, available charge and discharge energy, 24 smart-load channels | Off |
| Controls | Remote EMS and power switches, control-mode select, charge, discharge, PV, import, export and SoC limits | Off |
The EMS work mode sensor tells you which mode the plant is in. In the protocol document its values are Maximum Self Consumption, AI Mode, Time of Use, Full Feed-in, Remote EMS and Custom, and ours reads AI Mode.
What are the Remote EMS control modes?
When Remote EMS is on, the control-mode select picks one of nine behaviours. Sigenergy's protocol document defines them as register values, and the Home Assistant select uses the same names:
| Mode | Register value | What it does |
|---|---|---|
| PCS Remote Control | 0x00 | You dispatch power directly; the only mode where the power setpoints apply |
| Standby | 0x01 | Battery idle |
| Maximum Self Consumption | 0x02 | Solar first, battery covers the house, minimal grid use |
| Command Charging (Grid First) | 0x03 | Charges the battery, taking grid power first |
| Command Charging (PV First) | 0x04 | Charges the battery, taking solar first |
| Command Discharging (PV First) | 0x05 | Discharges, with solar output first |
| Command Discharging (ESS First) | 0x06 | Discharges, with battery output first |
| V2G | 0x08 | Vehicle-to-grid mode for a compatible DC charger |
Remote EMS is enabled through one register and the mode set through another (40029 and 40031 in the protocol document). The mode names are from the protocol, but the one-line descriptions are our plain-English reading, not Sigenergy's wording, so check them against your own results.
What did we see in the first days of running it?
Our observations cover a freshly commissioned system, so they describe behaviour, not durability. On 16 October the array produced about 16 kWh and the house used about 20.6 kWh, with the battery covering most of the evening.
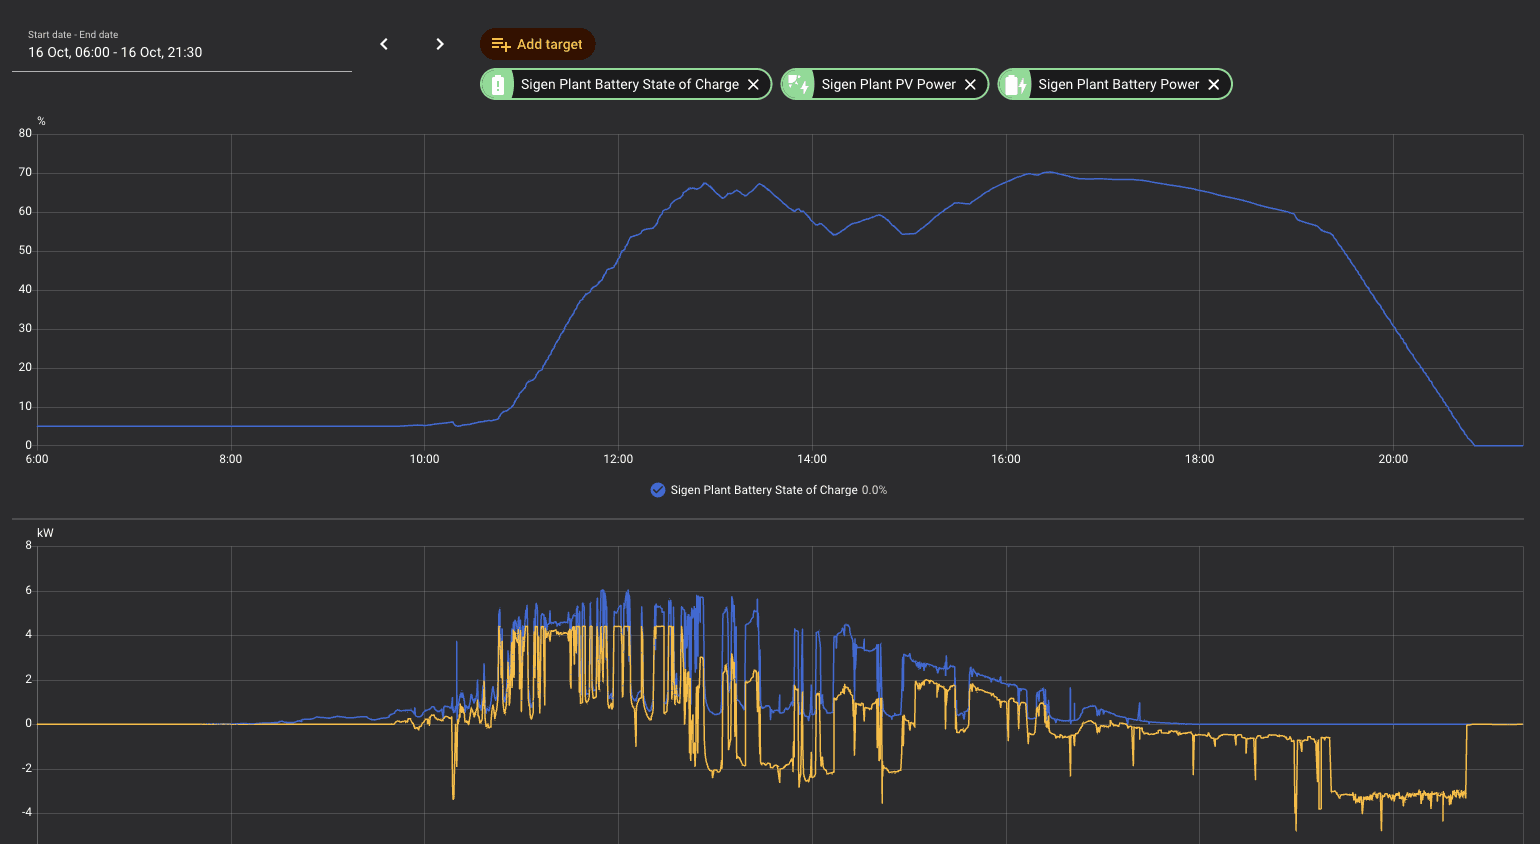
- AI mode let the battery run to empty. The charge cut-off reads 100% and the discharge cut-off and backup reserve both read 0%, so nothing stopped the battery reaching empty at about 20:50 and the plant dropping to Standby.
- Charging follows the rated limit. Charge power peaked near 4.4 kW, the plant's rated charge power, even when solar output was higher.
- Polling can be slow. The scan interval is 5 seconds, but the plant reported a maximum data fetch time of about 14 seconds since its last restart. Do not enable every disabled sensor, and leave the scan interval alone unless you see gaps.
- Entities went unavailable briefly on reload. Changing the options or enabling entities reloads the integration, and the plant sat in setup for about a minute before everything came back.
Does the integration work with Sigenergy EV chargers?
On paper, yes: the integration lists AC Charger and DC Charger as device types alongside the plant and inverter, and the README says charger entities include power, total energy and system state. We have not tested a Sigenergy charger, so nothing in this guide covers one beyond the documentation, and we have no charger entities on our install.
The UK AC charger datasheet describes 7, 11 and 22 kW variants, dynamic load management that needs the Sigen Power Sensor, and a schedule that can switch between solar-surplus and fast charging. It also lists RS485 Modbus RTU, 4G, Wi-Fi and Ethernet connectivity and OCPP 1.6J. A retailer lists a separate DC module with 12 kW and 25 kW variants that supports vehicle-to-home and vehicle-to-grid, though not every car supports bidirectional DC charging. For other charger options that do work with Home Assistant, see our best smart EV charger guide.
Why isn't it working? Common problems and fixes
It cannot connect. Modbus TCP is almost always the cause: the installer has not enabled it, or did not save it. Confirm the IP address, port 502 and slave ID 247, and check nothing else is holding a connection to the plant.
Some entities say unavailable or log exception code 2. The README says that code means a register is not supported on your firmware or hardware. Disable that entity rather than chasing it.
The control mode select is unavailable. It only becomes available once the Remote EMS switch is on.
The limit numbers read 4294967.295. That looks like an unset placeholder. Do not write the value back, and do not treat it as a baseline to restore.
Everything went unavailable at once. The plant's IP address has probably changed. Reserve it in your router (Step 2) and reconfigure the host.
The battery is at 0% and the plant is in Standby overnight. That is the battery being empty, not a fault. Raise the discharge cut-off or backup reserve if you want a floor.
Is Sigenergy a good fit for Home Assistant?
Yes, with caveats. The local Modbus route gives you real-time data, a clean Energy dashboard and a full control surface without any cloud dependency. The limits are about governance, not capability.
Pros
- Local polling over your own network, with no cloud account needed for the integration.
- Plenty of data from the first minute, with a deep catalogue behind it, including per-string solar data.
- Full control surface (modes, limits, reserves) once you enable it.
- Works alongside the Octopus Energy integration for tariff-aware automation.
Cons
- Community-maintained, with no official Sigenergy support statement that we could find.
- The installer must enable Modbus TCP, so you depend on them.
- No documented watchdog or fallback behaviour for Remote EMS, and an unconfirmed risk of losing AI mode.
- Unset limits and power switches that read oddly need careful handling.
What to do next
Add the read-only automations first and watch them for a week. If you are on an Octopus tariff, the Charge Pack currently lists Sigenergy as an eligible battery, which is worth checking before you build your own grid-charging logic. Our solar battery storage guide covers whether the economics stack up, and the solar monitoring guide covers the rest of your generation data.