What Is Z-Wave and Why Does It Matter for UK Homes?
Z-Wave is a low-power wireless protocol designed specifically for smart home devices. Unlike Wi-Fi or Bluetooth, Z-Wave operates on a dedicated sub-GHz radio frequency — 868.42 MHz in the UK and across Europe — which sits well below the crowded 2.4 GHz band used by Wi-Fi, Bluetooth, and Zigbee. The practical result is a signal that is far less susceptible to interference from your router, microwave, or neighbour's network.
Every Z-Wave device in your home acts as a mesh node, relaying signals for its neighbours. This self-healing mesh means a single dead spot rarely breaks your automations — traffic simply routes around it. If you are already running Home Assistant, adding Z-Wave is straightforward thanks to the built-in Z-Wave JS integration. See our Home Assistant UK setup guide if you have not yet installed Home Assistant.
Z-Wave vs Zigbee: Which Should You Choose?
Both Z-Wave and Zigbee are popular local mesh protocols supported by Home Assistant, but they have meaningful differences for UK buyers.
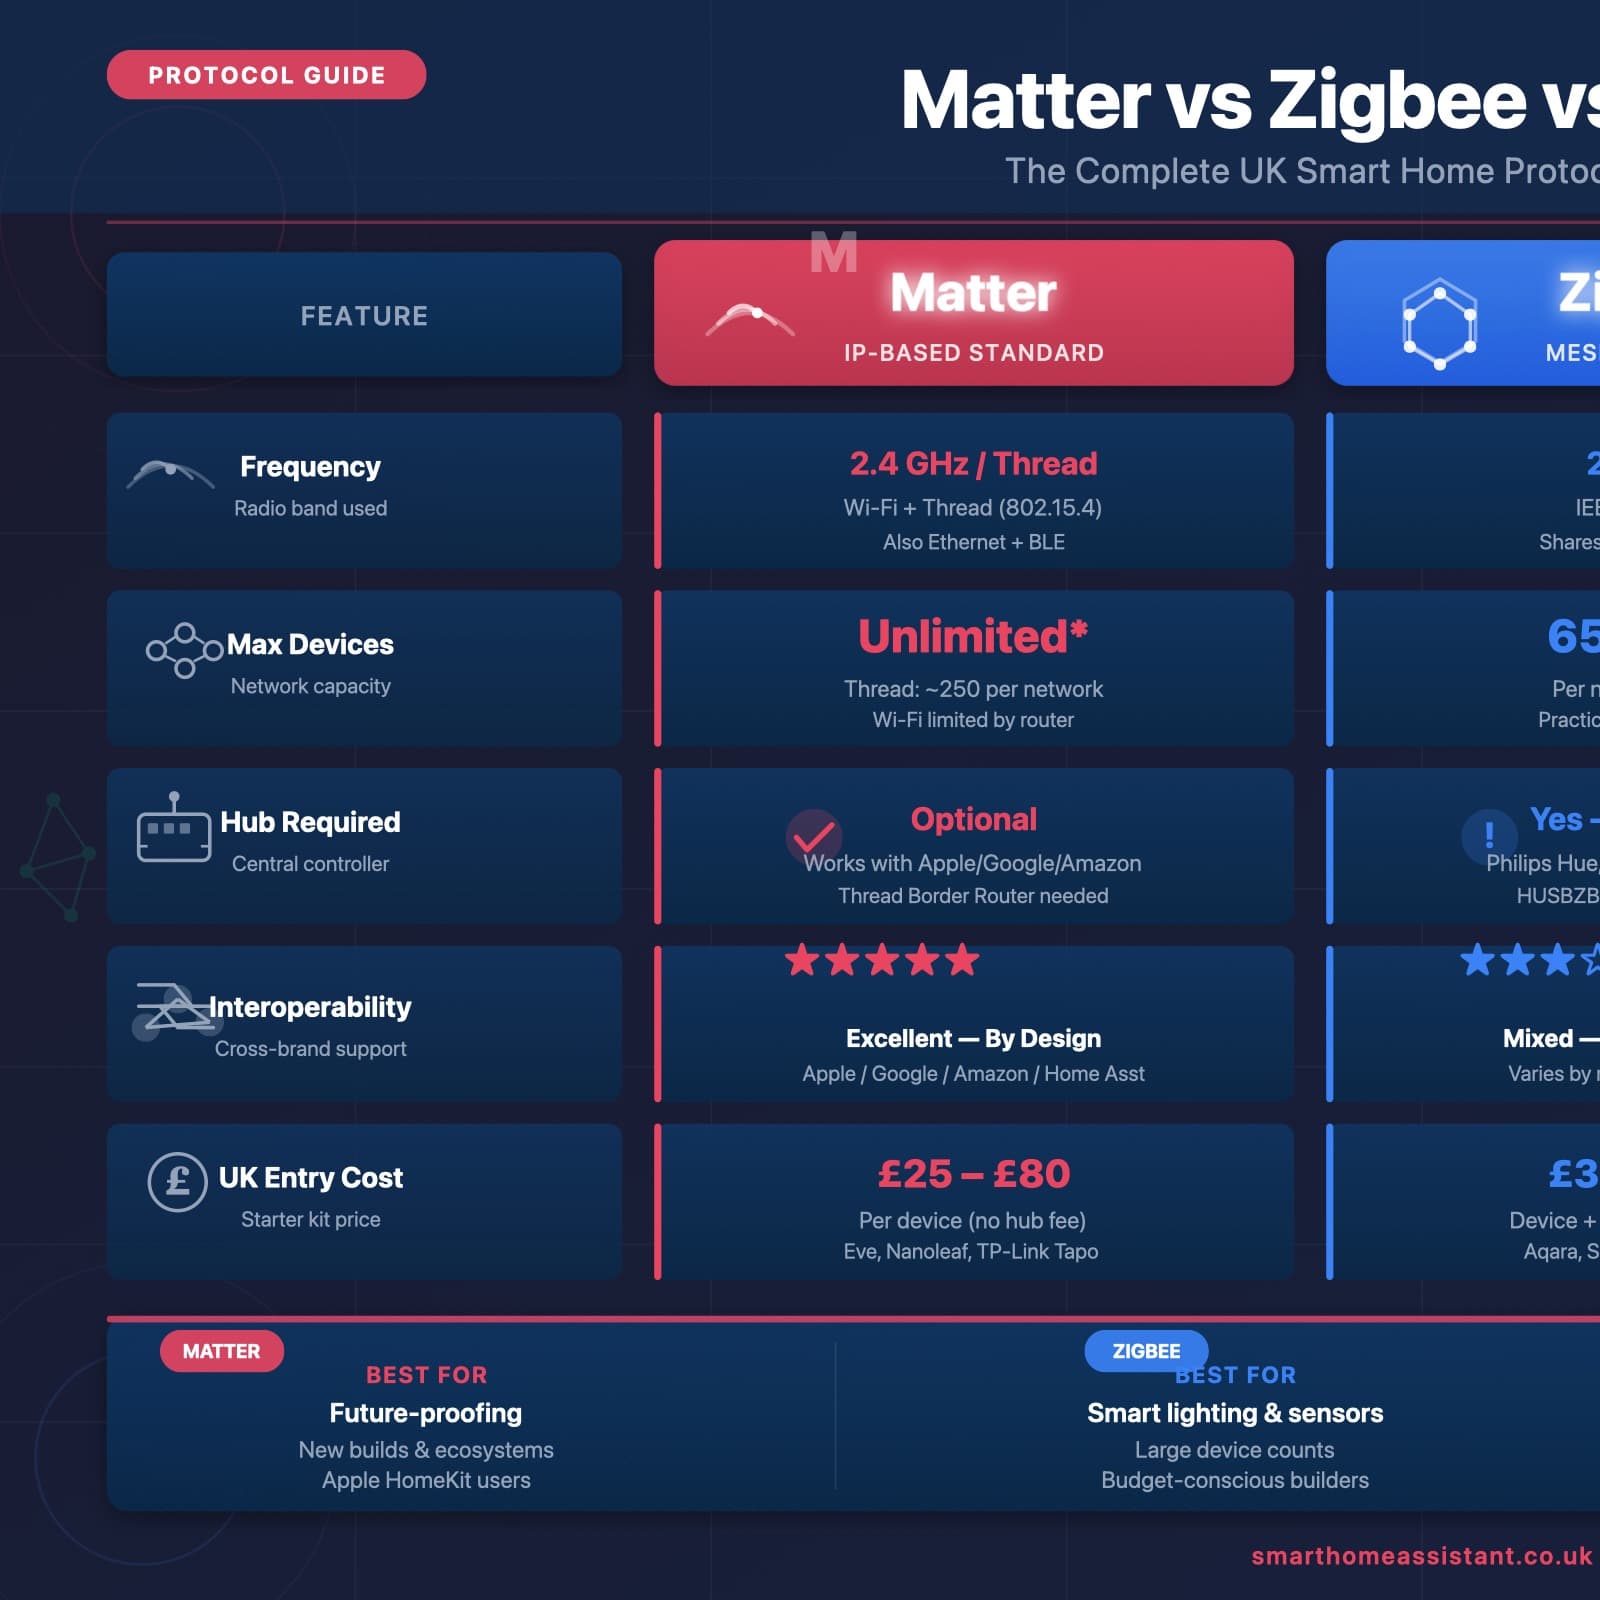
- Frequency: Z-Wave uses 868.42 MHz in the UK; Zigbee uses 2.4 GHz (same band as Wi-Fi).
- Interference: Z-Wave's sub-GHz frequency avoids Wi-Fi congestion entirely. Zigbee can suffer interference in dense Wi-Fi environments.
- Range per hop: Z-Wave typically achieves 30–100 metres per hop indoors; Zigbee is usually 10–30 metres.
- Device limit: A Z-Wave network supports up to 232 devices; Zigbee scales to tens of thousands.
- Ecosystem: Zigbee has a larger UK product range and lower average prices. Z-Wave devices tend to cost slightly more but are certified for interoperability.
- Interoperability: All Z-Wave devices are certified against a common standard, so mixing brands is reliable.
For most UK homes, Zigbee is the go-to protocol for smart bulbs and sensors thanks to price and availability. Z-Wave excels where you need maximum range, wall penetration, and guaranteed device interoperability — think door locks, smoke detectors, and motorised blinds. You can run both protocols simultaneously in Home Assistant using separate USB sticks. Our Zigbee stick UK guide covers the Zigbee side of the setup.
UK Z-Wave Frequency: 868.42 MHz
In the UK and the rest of Europe, Z-Wave is allocated the 868.42 MHz frequency band under the ISM radio regulations. This is fixed by the Z-Wave Alliance certification process — any device sold as Z-Wave EU/UK certified will use this frequency. It is important to buy the correct regional variant: US Z-Wave hardware operates at 908.42 MHz and is illegal to use in the UK on that frequency. Always confirm the product listing states EU or UK frequency before purchasing.
Modern 700-series and 800-series controllers (including the Aeotec Z-Stick 7) allow you to confirm or change the RF region inside Home Assistant — useful if you accidentally receive the wrong hardware.
Choosing a Z-Wave Controller for the UK
A Z-Wave controller is a USB stick (or integrated module) that acts as the hub of your Z-Wave mesh. It plugs into your Home Assistant server and gives Z-Wave JS the radio it needs to communicate with your devices.
The most widely recommended controller for UK Home Assistant users is the Aeotec Z-Stick 7 Gen5+. It is based on Silicon Labs' 700-series chip, supports S2 security and SmartStart, and is certified for the EU/UK 868.42 MHz frequency. The Z-Stick 7 is plug-and-play with Home Assistant — there is no driver installation on Linux. You can find it on Amazon.co.uk (Aeotec Z-Stick 7) for around £53–£60.
Other supported options include:
- Zooz ZST39 800 Series USB Stick — 800-series chip, excellent range, harder to source in the UK.
- Home Assistant Connect ZWA-2 — the official HA branded Z-Wave + Zigbee combo stick (800-series), ideal if you want a single dongle for both protocols.
Setting Up Z-Wave JS in Home Assistant
Home Assistant uses the Z-Wave JS integration to manage Z-Wave networks. Z-Wave JS is an actively maintained open-source project; the integration runs a local Z-Wave JS server add-on, so no cloud account is required.
Step 1: Plug in Your Z-Wave Stick
Insert the Aeotec Z-Stick 7 (or your chosen controller) into a USB port on your Home Assistant server. If you are running Home Assistant OS or Supervised, the stick will typically appear automatically in Settings → Hardware.
Step 2: Add the Z-Wave Integration
- Go to Settings → Devices & Services → Add Integration.
- Search for Z-Wave and select it.
- Home Assistant will prompt you to install the Z-Wave JS add-on — choose Recommended installation. This installs and starts the Z-Wave JS server automatically.
- Select the USB device path for your stick (e.g.
/dev/ttyUSB0or/dev/serial/by-id/...). - Network security keys are generated automatically for a fresh installation. Save these keys — you will need them to re-include devices if you ever reinstall.
Step 3: Set the RF Region
Navigate to Settings → Apps → Z-Wave JS → Configuration. Under the Options section, confirm the Radio Frequency Region is set to Europe (868.42 MHz). This is the correct setting for all UK Z-Wave devices.
Step 4: Include Your First Device
Z-Wave calls adding a device inclusion. To include a device:
- In the Z-Wave integration panel, click Add Device.
- Choose Include device (S2) for secure inclusion — most modern devices support S2 security.
- Put your Z-Wave device into inclusion mode (typically a button press — check your device manual).
- Home Assistant will discover the device, interview it, and create the appropriate entities (switches, sensors, locks, etc.).
For new devices that support SmartStart, you can scan the QR code on the device or its packaging directly from the Z-Wave JS panel before even powering the device on — it joins the network automatically on first power-up.
Z-Wave Mesh Network: How It Works
One of Z-Wave's greatest strengths is its self-healing mesh. Every mains-powered Z-Wave device (plug sockets, light switches, dimmers) acts as a routing node, relaying signals for battery-powered devices such as door/window sensors and motion detectors. The mesh can handle up to 4 hops between controller and destination device, allowing the network to span a large property.
Because Z-Wave operates at 868.42 MHz, the longer wavelength passes through brick, concrete, and timber floors significantly better than 2.4 GHz signals. A well-placed set of Z-Wave plug sockets can extend reliable coverage to garages, outbuildings, or through thick Victorian walls where Zigbee or Wi-Fi might struggle.
To view your mesh health in Home Assistant, open the Z-Wave integration and select Network Map. This shows every node and the routes between them, making it easy to identify weak links and decide where to add a powered device to strengthen coverage.
Key Benefits of Z-Wave for UK Smart Homes
- Interference-free: 868.42 MHz sits completely outside Wi-Fi, Bluetooth, and Zigbee bands.
- Long range: Up to 100 metres per hop outdoors; consistent 30+ metres indoors through walls.
- Interoperability: All Z-Wave devices are certified to the same standard — any brand can join any network.
- Local control: Z-Wave JS runs entirely on your Home Assistant server. No cloud, no subscription, no outage risk.
- Security: S2 framework provides AES-128 encryption for all device communications.
- Low power: Battery-powered Z-Wave sensors can last 1–3 years on a single set of AA batteries.
For further reading: see our Matter vs Zigbee vs Z-Wave comparison and our guide to setting up Zigbee2MQTT in Home Assistant.