ESPHome is one of the most powerful tools in the Home Assistant ecosystem — but writing and maintaining device YAML by hand puts it out of reach for many users. ESPConfig Designer changes that. Released as a free, open-source Home Assistant add-on in mid-2026, it wraps ESPHome's YAML engine in a fully visual, schema-driven editor that lives right inside the HA sidebar.
If you already use ESPHome with Home Assistant, ESPConfig Designer sits alongside it as a graphical front-end — it generates standard ESPHome YAML, compiles it with the ESPHome toolchain, and flashes your device over Wi-Fi or serial. If you've never tried ESPHome because YAML felt daunting, this is the tool that removes that barrier.
What ESPConfig Designer Does
Four main areas cover the complete ESPHome workflow:
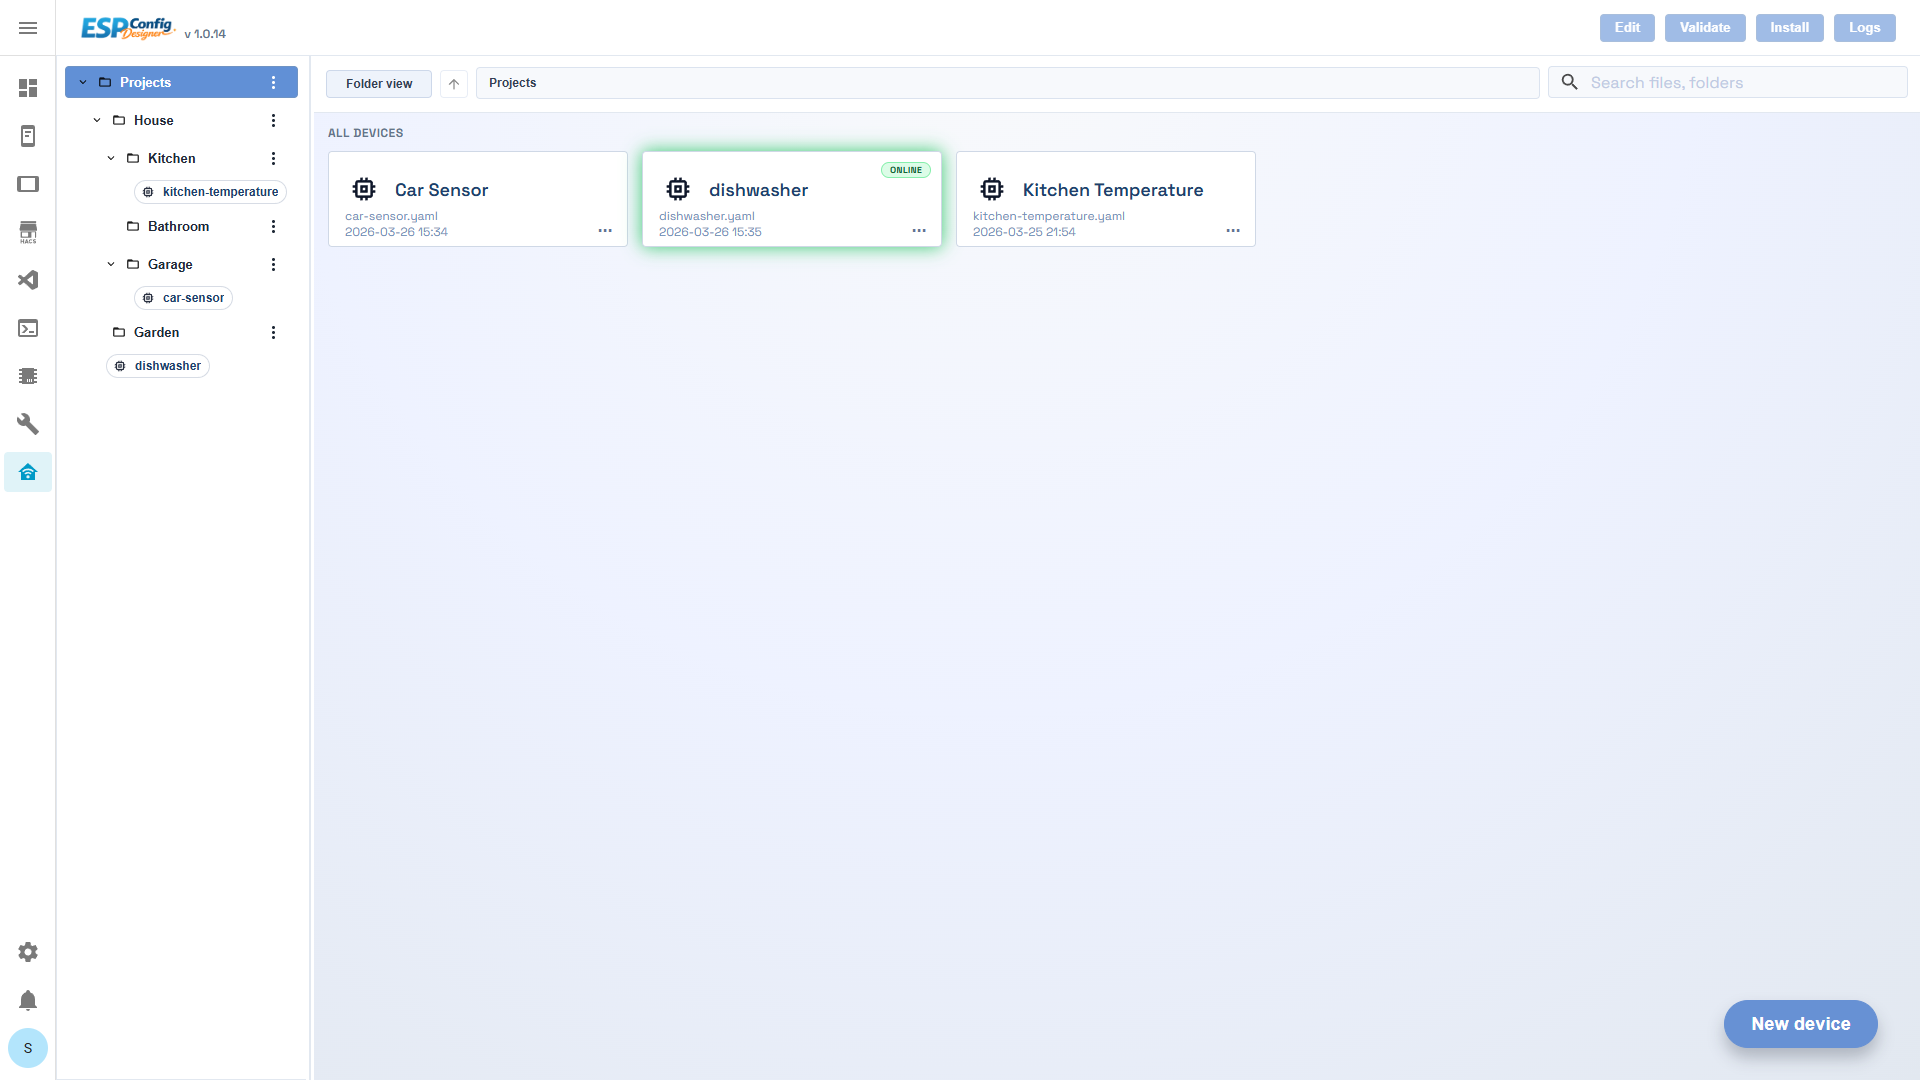
- Dashboard — browse and manage all your ESP device projects in a folder tree, see online/offline state at a glance, and launch actions without opening a single file.
- Builder — configure every ESPHome component (platform, Wi-Fi, sensors, displays, automations) through form fields driven by JSON schemas. A live YAML preview updates as you type so you always know what will be compiled.
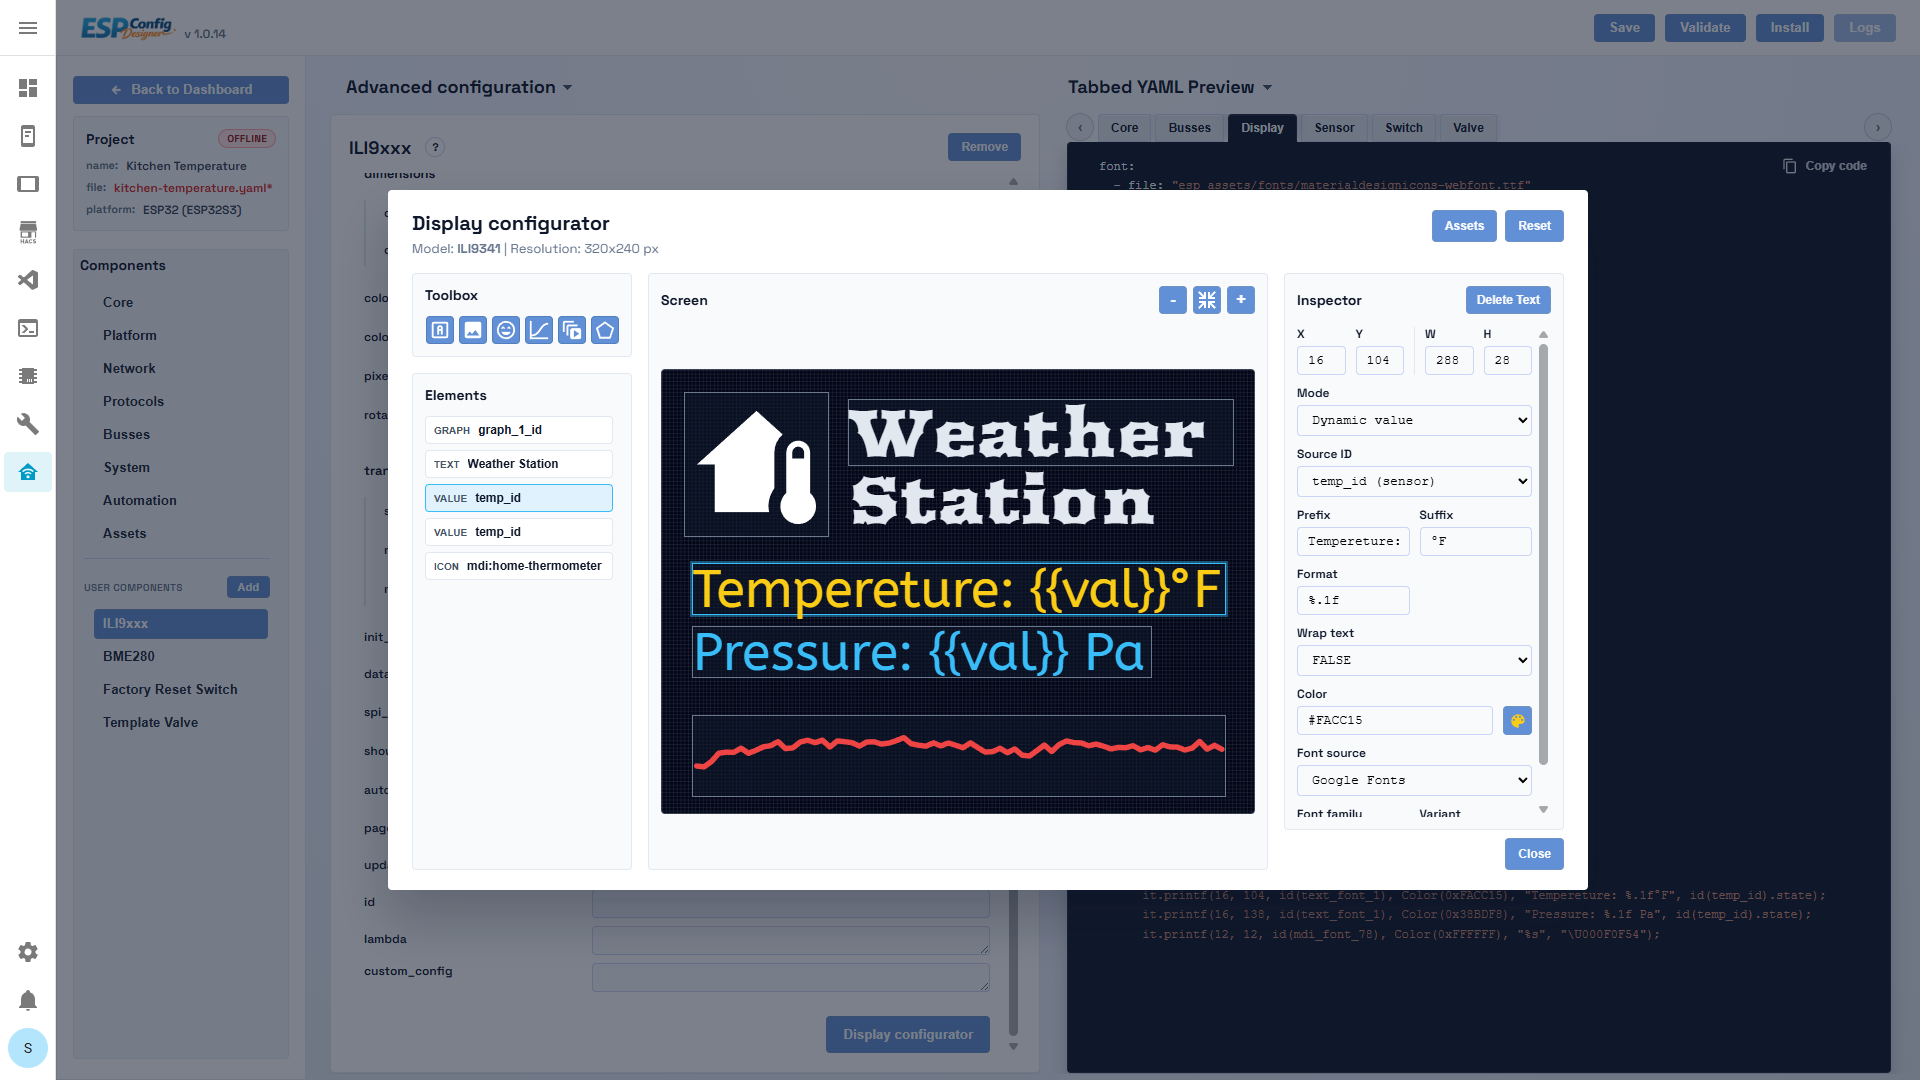
- Display Configurator — a canvas-based editor for e-paper and TFT display layouts. Drag text, icons, images, and shapes onto the screen; ESPConfig Designer generates the display lambda code automatically.
- Asset Manager — upload and manage the fonts, images, and audio files that ESPHome components reference, without manually editing paths in YAML.
The add-on runs as a Flask API with a Vue 3 frontend, embedded via Home Assistant's ingress system on port 8099. Project files are stored at /config/ecd/ by default, or at /config/esphome/ if you enable the shared-path option to co-locate configs with an existing ESPHome install.
How to Install ESPConfig Designer
ESPConfig Designer installs like any custom Home Assistant add-on. You'll need a Home Assistant instance with the Add-on Store available (Home Assistant OS or Supervised installations). It supports both amd64 and aarch64 hosts, so it works on a Raspberry Pi 4/5, an Intel NUC, or a Proxmox VM.
- In Home Assistant, go to Settings → Add-ons → Add-on Store.
- Click the three-dot menu (⋮) in the top-right corner and select Repositories.
- Paste the repository URL:
https://github.com/sokolsok/ESPConfig-Designerand click Add. - Refresh the page. ESPConfig Designer will appear in the store — click it, then click Install.
- Once installed, click Start. Enable Show in sidebar if you want quick access.
If you already have the ESPHome add-on installed and want ESPConfig Designer to share the same YAML folder, toggle use_esphome_shared_path to true in the add-on's Configuration tab before starting it. This lets both add-ons see the same device configs.
Building Your First Device Config
Click “New device” on the Dashboard to create your first project. You'll give it a name and choose a target board — the Builder opens immediately, organised into tabs that mirror ESPHome's YAML structure: Platform, Network, Display, Sensors, Automations, and more.
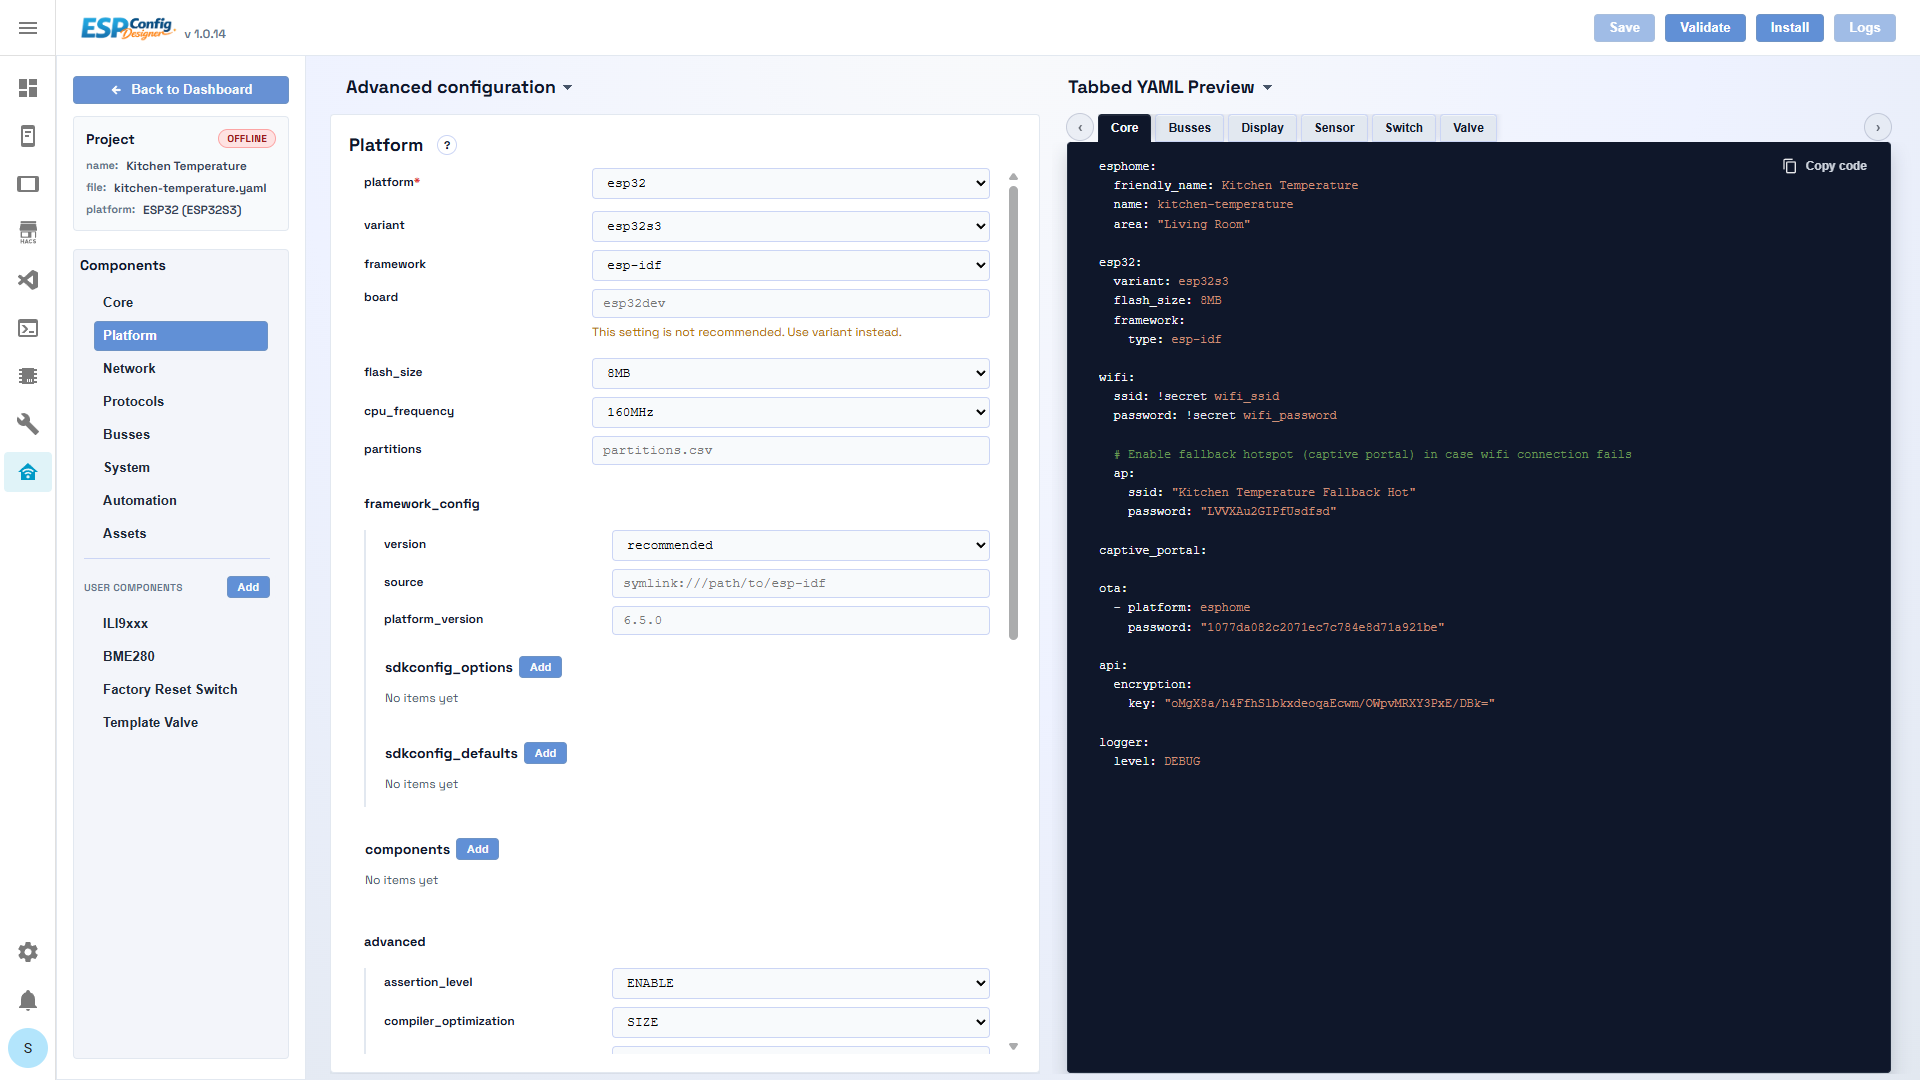
Each component section is rendered from a JSON schema — you select a platform (e.g. esp32, esp8266), fill in Wi-Fi credentials, add sensor components from a searchable catalogue, and configure them through typed fields with drop-downs and toggles. The live YAML preview on the right-hand side updates in real time so you can verify the output before compiling.
The action bar at the top of the Builder contains everything you need to go from config to flashed device: Save persists the project JSON and YAML file, Validate runs ESPHome's config checker, Compile builds the firmware, and Install pushes it to the device over-the-air. A streaming log panel shows the output of each job as it runs. This is the same toolchain you'd invoke with the standard ESPHome add-on — ESPConfig Designer just drives it through the UI.
This makes ESPConfig Designer a natural complement to the best Home Assistant add-ons for power users who want visual tooling without giving up ESPHome's flexibility.
Display Configurator and Asset Manager
The Display Configurator is the most distinctive feature. If you're working with an e-paper or TFT display — weather stations, sensor dashboards, name badges — you can design the layout visually on a canvas preview that matches your screen resolution. Text, icons, images, shapes, and graphs are all supported. When you save the layout, ESPConfig Designer generates the ESPHome display: lambda block automatically, including font and image references resolved from the Asset Manager.
The Asset Manager handles fonts (TTF/BDF), images (PNG/JPEG), and audio files in one modal. Upload files once and reference them across any project — ESPConfig Designer tracks paths and generates the correct YAML asset blocks for you.
Licence, Maturity, and What to Expect
ESPConfig Designer is MIT-licensed and fully open-source. At version 1.2.2 it covers the core ESPHome component catalogue, project persistence, secrets file editing, and the complete validate/compile/OTA/serial-flash/logs workflow. The schema system is extensible — the developer may in future offer optional paid schema packs as a separate distribution outside the main repository.
Because the tool is very new, you may encounter gaps in component coverage or schema edge cases. The project accepts issues on GitHub and the schema authoring documentation is public, so contributing schemas for missing components is straightforward. Generated YAML is always standard ESPHome YAML, so you can drop out to the ESPHome editor at any point if you need to tweak something by hand.
For anyone already building Home Assistant automations and looking to extend their setup with custom ESP-based sensors and devices, ESPConfig Designer significantly lowers the entry barrier without locking you into a proprietary format.